How to Easily Integrate Odoo and ONLYOFFICE Docs on Ubuntu
Odoo is an open-source business platform that comes with a vast set of productivity apps allowing you to deal with what an average company needs — sales, CRM, electronic commerce, project management, human resources, accounting, inventory, marketing, etc.
The built-in Odoo marketplace makes it possible to create a highly customizable platform that can be easily adapted to any business by installing the required apps. The choice is so extensive that exploring all the available integration options might take a lot of time.
One of the best ways to turn your Odoo platform into a collaborative hub for teams and businesses is to enable document editing and co-authoring. If this is what you need, you will find this article helpful.
In this tutorial, you will find out how to install and configure Odoo as well as how to integrate it with ONLYOFFICE Docs, an open-source office suite for document collaboration, on Ubuntu.
Install Odoo in Ubuntu
If you don’t have a running instance of Odoo, you can take a look at our Odoo installation guide. However, ONLYOFFICE Docs can be integrated only with the latest version of the platform, Odoo 16.0, so the installation process might be a bit different. That’s why it’s highly recommended to visit the official Odoo documentation for up-to-date instructions.
Install ONLYOFFICE Docs in Ubuntu
ONLYOFFICE Docs is an open-source office package made up of web-based editors and viewers for text documents, spreadsheets, presentations, digital forms, electronic books, and PDF/DJVu files.
The suite allows you to collaboratively work on documents in real-time with other users and even comes with a ChatGPT plugin to make it easier to generate and analyze texts.
ONLYOFFICE Docs offer integration options for a large number of third-party platforms, including Odoo. Other examples are Nextcloud, WordPress, Alfresco, Seafile, Moodle, and more.
For ONLYOFFICE Docs, there are many installation options. One of the easiest ones is running it as a Docker image. However, if you don’t want to use Docker, you can effortlessly install the latest version of ONLYOFFICE Docs (ONLYOFFICE Document Server) on Ubuntu by following our ONLYOFFICE Docs installation guide.
Install ONLYOFFICE Connector for Odoo Platform
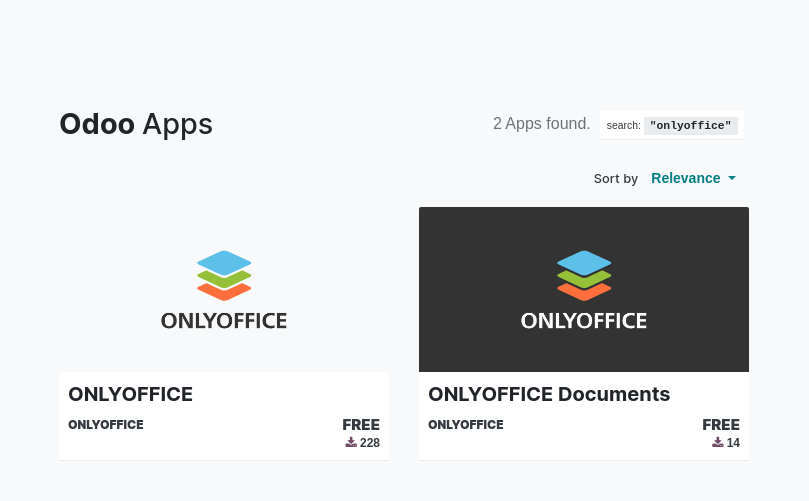
When your instances of ONLYOFFICE Docs and Odoo are ready for integration, you need to get an official integration app. To do so, you can visit the official Odoo marketplace, find ONLYOFFICE and download the app for your version of the platform.
However, you need to be careful. On the Odoo App Store, there are two versions of the ONLYOFFICE connector. One of them is for Odoo Community, and the other one is for Odoo Enterprise. If you are running the free community version of the platform, choose an app called ONLYOFFICE.
Alternatively, the latest version of the connector can be downloaded from the GitHub page.
Then, you need to copy or move the ONLYOFFICE connector folder named onlyoffice_odoo into the /…/odoo/addons folder. Alternatively, this can also be done by adding these lines to the /…/odoo/config/odoo.conf file:
[options]
addons_path = /mnt/extra-addons
Don’t forget to specify the path to your folder with apps/addons.
When ready, it’s time to install the PyJWT library with the following pip command.
$ pip install pyjwt
After that, you need to restart your Odoo instance. Log into the platform, find the Apps menu, and click Update Apps List.
Configure ONLYOFFICE for Odoo
Before using ONLYOFFICE Docs in Odoo, you need to adjust some settings of the ONLYOFFICE connector. To access the configuration page, go to Settings and find ONLYOFFICE.
You will see the following fields:
- Document Server Url – enter the URL of your ONLYOFFICE Docs instance.
- Document Server JWT Secret – the JWT secret key is generated automatically, so you don’t need to change anything here. However, if you want to use your own secret key to prevent unauthorized access to your documents, you need to specify the same secret key in the ONLYOFFICE Docs config file.
- Document Server JWT Header – ONLYOFFICE’s standard header is Authorization. Nevertheless, you can always use your own header if the standard one conflicts with the current setup of your server.
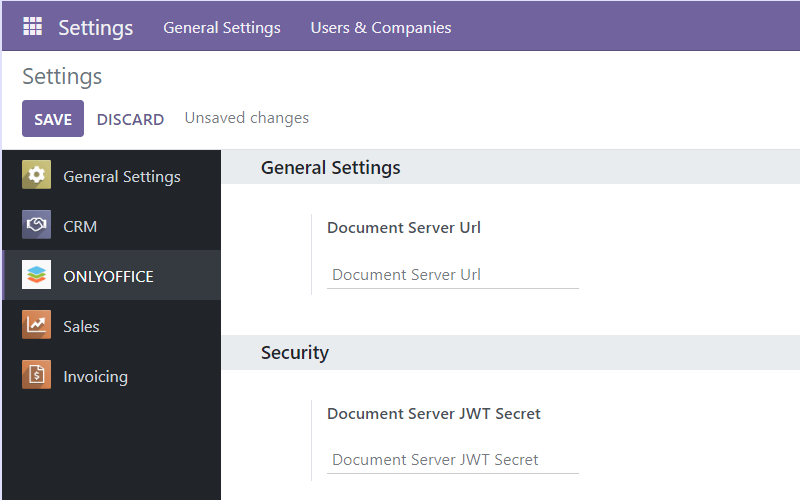
If done correctly, the configured connector will allow you to access your installed ONLYOFFICE Docs instance (ONLYOFFICE Document Server) and use its functionality when working on the Odoo platform.
For instance, you will be able to do the following:
- Open and edit office documents in any Odoo section where it’s possible to upload or attach files.
- Co-edit documents, presentations, spreadsheets, and fillable forms with other Odoo users in real time using some collaborative features, such as Fast and Strict co-editing modes, Track Changes, comments, and communication via the built-in text chat.
- Open PDF files for viewing.
The integrated solution fully supports OOXML formats (DOCX, XLSX, and PPTX) and is compatible with some other popular formats which are available for viewing. For example, DJVU, DOC, DOT, DOTX, EPUB, FB2, HTML, ODT, OTT, RTF, TXT, XPS, XML, CSV, and more.
Moreover, the ONLYOFFICE connector makes it possible to work with fillable forms in Odoo. You can create editable templates in the DOCXF format, ONLYOFFICE’s own format for form templates, and open OFORM files for viewing. This format is used in the ONLYOFFICE suite to create forms with interactive fields.
This is all you need to know about the ONLYOFFICE and Odoo integration. If you have questions or suggestions, don’t hesitate to share them with us by leaving your comment below.

![Getting Started with PowerShell in Linux [Beginner Guide]](https://webomate.net/wp-content/uploads/2024/02/getting-started-with-powershell-in-linux-beginner-guide.png)
