How to Configure IPv4 and IPv6 Addresses in Linux
As a systems administrator, you will occasionally be tasked with configuring or setting up the IP addresses of your servers to keep up with changing network requirements. As such, having fundamental skills in assigning IP addresses and configuring hostname resolution is crucial in ensuring that servers conform with the network topology.
In this topic, we will first look at what an IP address is and delve into the differences between Ipv4 and IPv6. Then finally, we will demonstrate how to configure IPV4 and IPv6 addresses on a Linux system as well as hostname resolution.
What is an IP Address?
An IP address, which stands for Internet Protocol, is a unique numerical identifier or address that identifies a device in a TCP/IP network. This could be a local area network (LAN) or the internet.
The IP address allows communication between devices in a network such as servers, routers, switches, and any other network device connected to the network.
Difference Between IPv4 vs IPv6
An IP address can be broadly categorized into two: IPv4 and IPv6.
IPv4 Address
An IPv4 (IP version 4) address is a 32-bit number that is split into four octets, with each octet separated by a period or a decimal point. This is usually referred to as dotted-decimal format.
Each octet is made up of 8 bits which collectively represent a byte. An IPv4 address can further be divided into two sections. The first part represents the network section, while the remaining part defines the host section.
Network Section
The network section of an IP address identifies the class the IP address belongs. There are 3 distinct classes of IP addresses used in computer networks: Class A, Class B, and Class C.
What is IPv4 Class A
In Class A type of network, the first 8 bits (octet) define the network, while the remaining 24 bits are reserved for the hosts in the network.
- The Public IP addresses range from 1.0.0.0 to 127.0.0.0.
- The Private IP addresses range from 10.0.0.0 to 10.255.255.255.
Addresses 127.0.0.0 to 127.255.255.255 are reserved for loopback and other diagnostic purposes, and hence are not allocated to hosts in a network.
The default subnet mask of class A is 255.0.0.0 with the first 8 bits used to identify the network. The remaining 24 bits are designated for hosts. This class is used in networks that command a large number of hosts. It yields a maximum of 16,777,214 hosts and 126 networks.
What is IPv4 Class B
In Class B, the first two octets, or 16 bits are used to define the network ID.
- The Public IP addresses range from 128.0.0.0 to 191.255.0.0.
- The private IP range is from 172.16.0.0 to 172.31.255.255.
The default subnet mask is 255.255.0.0 where the first 16 bits define the network ID. This class of IP is typically used for medium-large networks and yields 65,534 hosts per network with a total of 16,382 networks.
What is IPv4 Class C
This class of IP is mostly used for small networks such as a home network or a small office or business.
In a Class C network, the first two network bits are set to 1 while the third is set to 0, i.e. 1 1 0. The remaining 21 bits of the first three octets define the network ID, and the last octet defines the number of hosts.
As such, Class C IP address produces the highest number of networks amounting to 2,097,150, and the least number of hosts per network which is 254 hosts.
- The public IP addresses range from 192.0.0.0 to 223.255.255.0.
- The private IP range is from 192.168.0.0 to 192.168.255.255.
The subnet mast is 255.255.255.0.
Host Portion
The remaining section of the IP address is the host portion, which is the section that determines the number of hosts in a network. This part uniquely identifies a host in a network. All hosts in the same network share the same network portion.
For example, the following host IP addresses belong to the same network.
192.168.50.15
192.168.50.100
192.168.50.90
IPv6 Address
An IPv6 address is an alphanumeric address that is 128 bits long, arranged in eight groups, each of which contains 16 bits.
Like an IPv4 address, it is split into two parts: the network and host component. The network part makes up the first 64 bits and is used for routing purposes. The remaining 64 bits identified the address on the nodes.
Below is an example of a full IPv6 address.
fe80:ce00:0000:5029:45ff:0000:211E:469C
This can be further shortened as follows.
fe80:ce00:0:5029:45ff:0:211E:469C
IPv6 was developed as a solution to the imminent exhaustion of addresses in IPv4. As you know by now, IPv6 contains 128 bits which is four times more than the number of bits in IPv4 (32 bits). These extra bits provide more addressing space which will supplement the address provided by IPV4.
Although IPv6 is set to take over from IPv4 addressing in the near future, many organizations and ISPs still use and largely rely on IPv4 addresses.
In fact, you’ll hardly ever need to configure an IPv6 on your device to provide connectivity. The fact is, it will take a while before IPv6 replaces or phases out IPv4.
Dynamic (DHCP) and Static IP Configuration
IP allocation on client machines or any end-point devices connected to a network is done either using the DHCP protocol or manual configuration where IP addresses are statically allocated.
DHCP IP Address
DHCP (Dynamic Host Configuration Protocol) is a client-server protocol that dynamically allocates IP addresses to client systems on a network. The DHCP server, which in most cases is a router, contains a pool of addresses that it leases out to client devices on a network for a certain period of time. Thus, it simplifies and makes the configuration of IP addresses more efficient. Once the lease time lapses, the client acquires a new IP address.
Most systems, by default, are configured to obtain an IP automatically using the DHCP protocol. This eliminates the possibility of IP conflicts in a network where two devices share the same IP address.
The drawback of DHCP is that the IP addresses change once the lease expires. If a server is set to acquire an IP via DHCP, this will lead to connectivity issues once the IP address changes. And this is where static IP configuration comes in.
Static IP Address
In static IP configuration, IP addresses are manually configured on a client system, especially servers. Unlike dynamically allocated addresses, statically configured IP addresses remain the same and do not change.
However, the static configuration requires a lot of work from network admins. They have to manually log in and configure the static IP along with other details such as subnet mask, DNS servers, and gateway IP. In addition, they need to keep track of all the client systems with static IP addresses.
In this tutorial, we will focus on how to statically configure IP addresses on various systems.
How to Configure IPv4 Networking in Linux
In this section, we will shift focus and see how to configure an IPv4 address on Linux. We will look at how you can do this on Debian, Ubuntu, and later on RHEL and Red Hat distributions.
Configure IPv4 Address on Debian
To get started, it’s always a good idea to check your current IP configuration of the Linux system.
$ ip a
This displays the IP addresses and status of your network interfaces. From the output, we have two interfaces.

The first one is the lo interface which is a loopback address reserved for testing purposes only and is always designated the address 127.0.0.1. The loopback address is not associated with any physical network interface.
The second interface is enp0s3 (this might be different in your case). This is the active network interface that maps to the physical network card on the server.
Its IPv4 address is denoted by the inet parameter, and in this case is 192.168.2.113, which is assigned via the DHCP protocol.
In Debian, the network configuration is contained in the /etc/network/interfaces file. You can view it using the nano or vim editor.
$ sudo nano /etc/network/interfaces
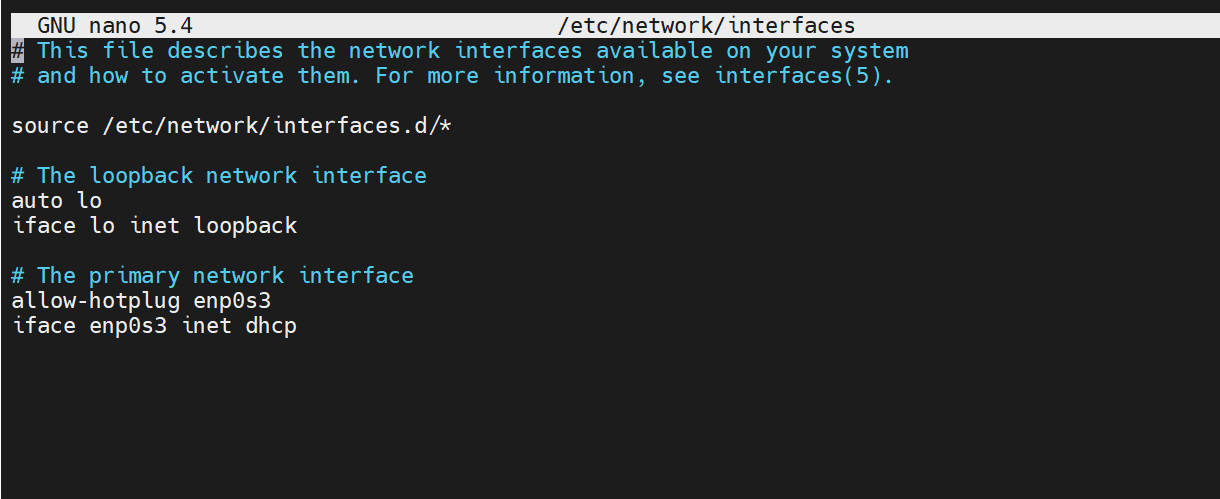
To configure a static IPv4 address, remove or comment the allow-hotplug and dhcp lines, Then add the following configuration.
# The primary network interface
auto enp0s3
iface enp0s3 inet static address 192.168.2.150 netmask 255.255.255.0 gateway 192.168.2.1 dns-nameservers 192.168.2.1 8.8.8.8
In this configuration, 192.168.2.150 will be our new IPv4 address with a netmask or network subnet of 255.255.255.0. The default gateway, which also happens to be the router’s IP, is 192.168.2.1 while the DNS nameservers are 192.168.2.1 and 8.8.8.8.
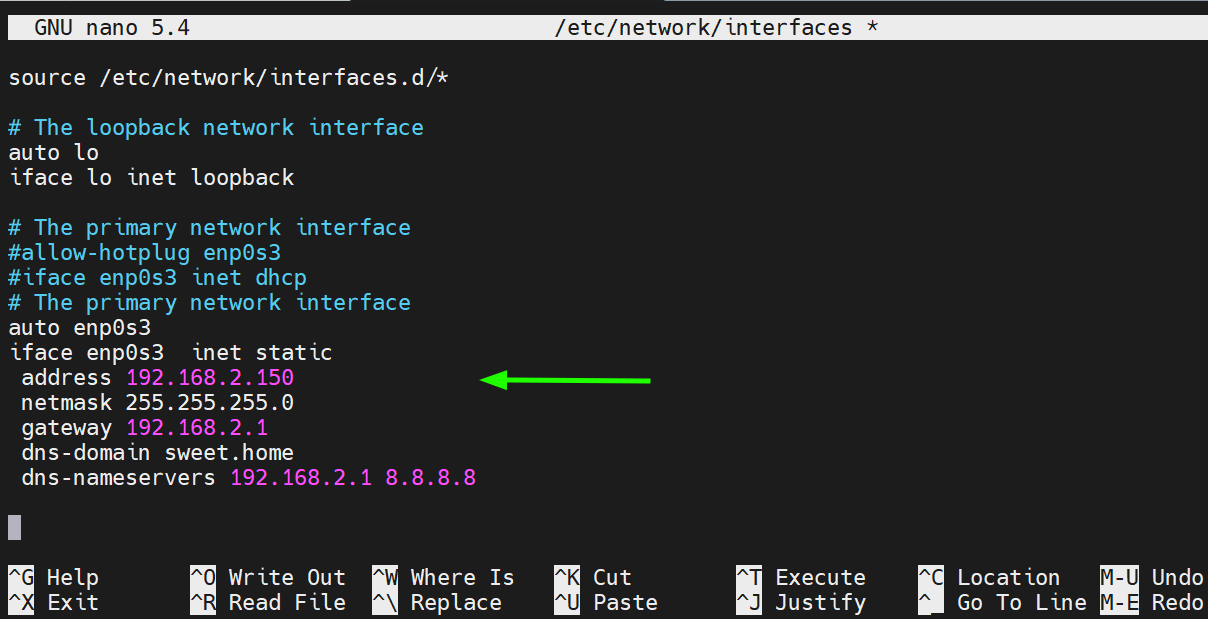
Save the changes and exit the file.
To apply the changes, restart the networking service.
$ sudo systemctl restart networking.service
Then confirm no errors were encountered
$ sudo systemctl status networking.service
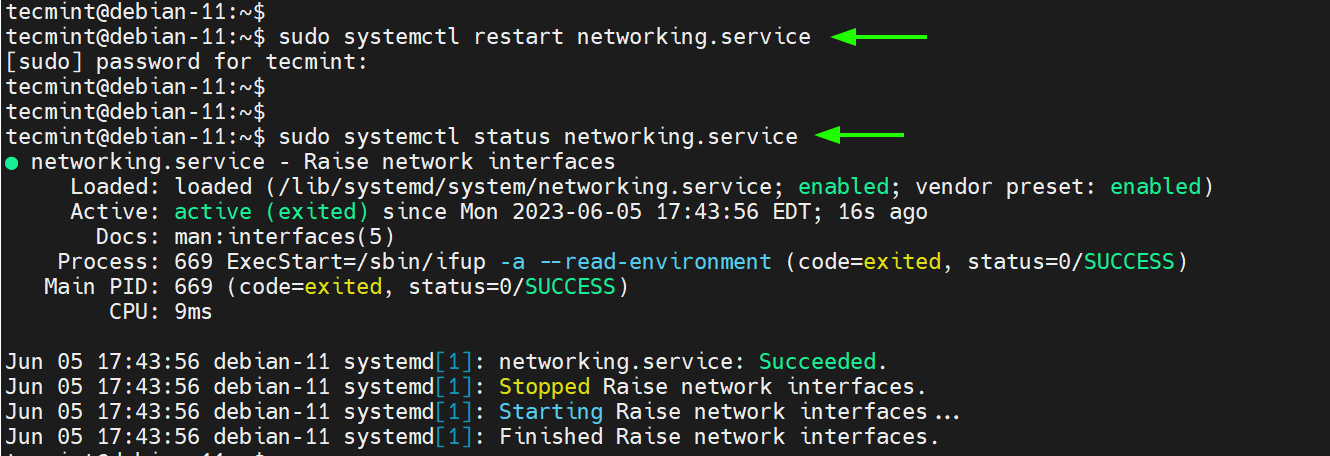
To confirm that the server has acquired the new IP, run the following command:
$ ip -c addr show enp0s3
The output below confirms that we have successfully configured the static IPv4 address.

Configure IPv4 Address on Ubuntu
In Ubuntu 18.04 and later versions, Netplan is the default network configuration tool, which enables easy configuration of network settings via YAML files. According to Canonical, netplan processes the YAML files and generates network configurations for systemd-network or NetworkManager.
The network configuration file for modern Ubuntu distributions is located in the /etc/netplan directory. For the desktop system, the configuration file in this directory is 01-network-manager-all.yaml. For servers, the file is /etc/netplan/01-netcfg.yaml.
Once again, let’s check our current IP address which is auto-assigned by DHCP.
$ ip a
Our current IP is 192.168.2.106. We will set this to 192.168.2.180.

To assign an IPv4 address, we will open the network configuration file.
$ sudo nano /etc/netplan/01-network-manager-all.yaml
By default, the following lines automatically set the system to use DHCP for IP assignment.

Add the following lines to assign a static IP.
ethernets: enp0s3: addresses: - 192.168.2.180/24 nameservers: addresses: [8.8.8.8, 8.8.4.4] routes: - to: default via: 192.168.2.1
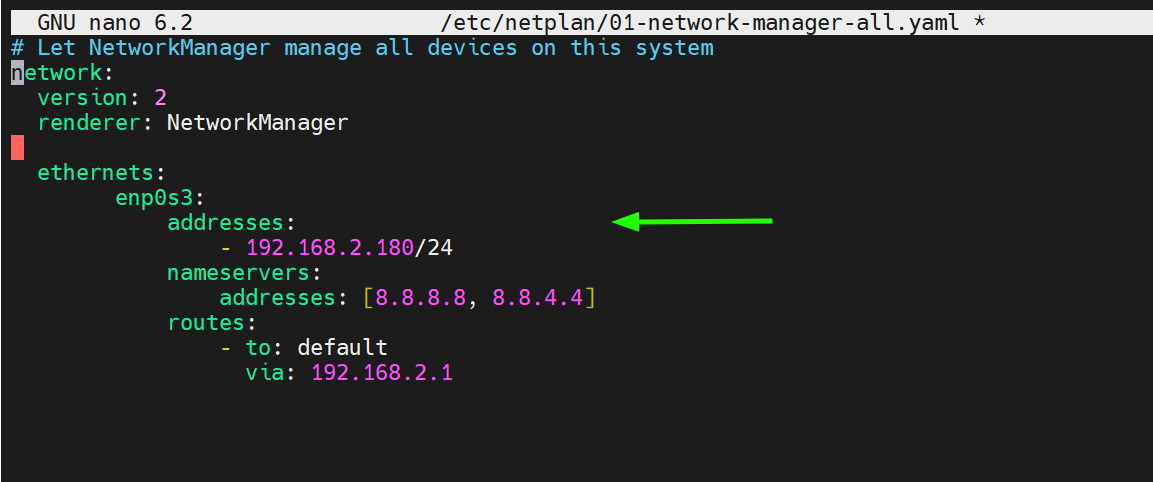
Let us break down the parameters used:
- enp0s3 – is the name of the network interface.
- addresses – This configures the IPv4 address on the interface. This is followed by the CIDR, in this case,/24 which implies a network subnet of 255.255.255.0.
- nameservers – This specifies the DNS servers to be used. In this case, we are using 8.8.8.8 and 8.8.4.4 which are Google’s name servers.
- routes – This sets the gateway on your system.
Remember to replace the interface name and IP configuration to match your network environment.
Save the changes and exit.
To apply the changes made, run the following command:
$ sudo netplan apply
Once again, verify if the changes have been reflected as shown.
$ ip -c addr show enp0s3

Configure IPv4 Address on RHEL
In Red Hat distributions, the nmcli (NetworkManager Command Line Interface) command-line tool is one of the most preferred ways of configuring an IPv4 address. It does so using the NetworkManager service.
To view the network interface name attached to your system, execute the command:
$ nmcli device
To display the active connection, run the command:
$ nmcli connection show
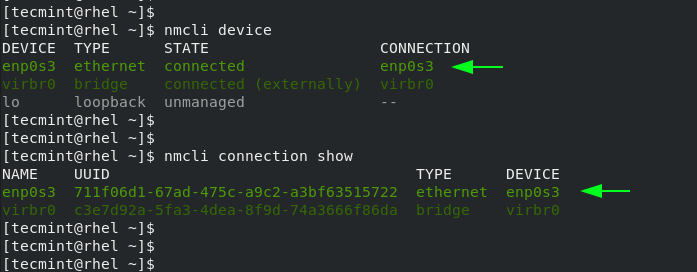
In RHEL 9 and other Red Hat distributions based on RHEL, the network configuration file resides in the /etc/sysconfig/network-scripts directory. In our case, the configuration file is ifcfg-enp0s3.
We will assign a static IPv4 address on the interface ‘enp0s3‘ as shown:
IP: 192.168.2.100
netmask: 255.255.255.0
gateway: 192.168.2.1
dns: 8.8.8.8
To do so, we will run the following commands:
$ sudo nmcli con mod enp0s3 ipv4.addresses 192.168.2.100/24
$ sudo nmcli con mod enp0s3 ipv4.gateway 192.168.2.1
$ sudo nmcli con mod enp0s3 ipv4.method manual
$ sudo nmcli con mod enp0s3 ipv4.dns "8.8.8.8"
$ sudo nmcli con up enp0s3

The commands save the changes inside the associated network configuration file. You can view the file using your preferred text editor
$ sudo nano etc/sysconfig/network-scripts ifcfg-enp0s3
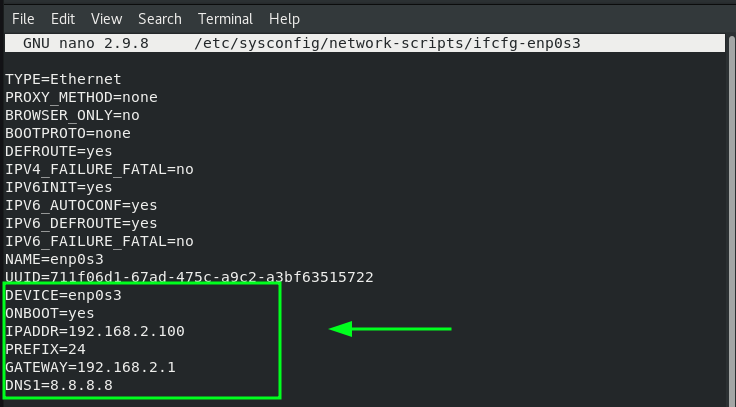
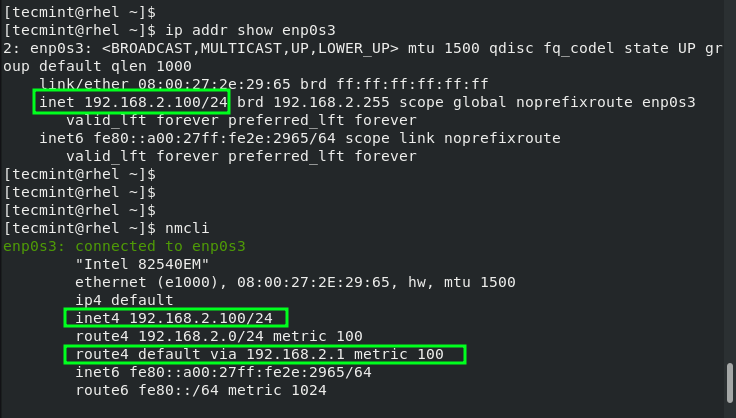
To confirm the new IP address, run the following command
$ ip addr show enp0s3
You can also run the nmcli command without any command-line options and the active interface will be displayed at the top.
$ nmcli
How to Configure Hostname in Linux
A well-configured system should be able to resolve its hostname or domain name to the IP address configured. Usually, the hostname and IP address mapping is done in the /etc/hosts file.
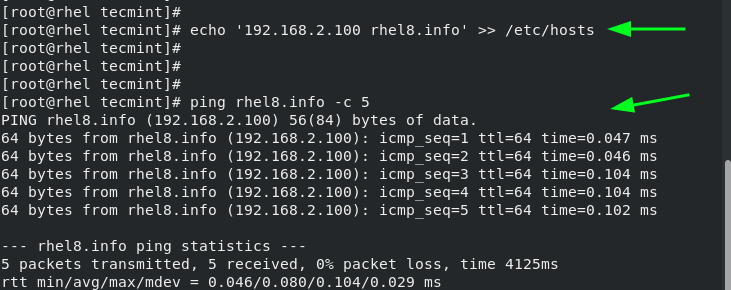
To configure hostname resolution, add a host’s entry to the /etc/hosts file. This entry includes the host’s IP address and the hostname as shown.
$ echo '192.168.2.150 debian-11' >> /etc/hosts
Be sure to update the /etc/hosts file on every Linux system that you intend to connect to the system on the same local network.
Once done, you can successfully ping the hostname of the Linux machine.
$ ping debian-11 -c 5
Conclusion
In this tutorial, we have covered IPv4 and IPv6 IP addresses and explored how you can configure IPv4 networking and hostname resolution on Linux.

