
How to Install PostgreSQL Using Source Code in Linux
PostgreSQL also called Postgres is a powerful and open-source object-relational database system. It is an enterprise-level database having features such as write-ahead logging for fault tolerance, asynchronous replication, Multi-Version Concurrency Control (MVCC), online/hot backups, point-in-time recovery, query planner/optimizer, tablespaces, nested transactions (savepoints), etc.
Postgres’s latest version 15.2 was released on 9 February 2023 by the PostgreSQL global development group.
PostgreSQL Features
Features of the new version are as follows:
- Logical Replication: This feature enables the replication of individual database objects (be it rows, tables, or selective databases) across standby servers. It provides more control over data replication. Implemented by using the publisher-subscriber model.
- Quorum Commit for Synchronous Replication: In this feature, dba can now specify the number of standby’s that acknowledge that the changes to the database have been done, so that data can be considered safely written.
- SCRAM-SHA-256 authentication: Improved security that existing MD5-based password authentication and storage.
- Improved parallel query execution.
- Declarative table partitioning.
- Full-text search support for JSON and JSONB.
In this article, we will explain how to install PostgreSQL 15 using source code installation in Linux systems. Those who are looking for easy installation from the distribution package manager can follow the below guides.
Installing PostgreSQL from Source
As postgres is an open-source database, it can be built from source code according to one’s needs/requirements. we can customize the build and installation process by supplying one or more command line options for various additional features.
The major advantage of using source code installation is it can be highly customized during installation.
1. First install required prerequisites such as gcc, readline-devel, and zlib-devel using the package manager as shown.
# yum install gcc zlib-devel readline-devel [On RHEL/CentOS]
# apt install gcc zlib1g-dev libreadline6-dev [On Debian/Ubuntu]
2. Download the source code tar file from the official postgres website using the following wget command directly on the system.
# wget https://ftp.postgresql.org/pub/source/v15.2/postgresql-15.2.tar.bz2
3. Use the tar command to extract the downloaded tarball file. A new directory named postgresql-15.2 will be created.
# tar -xvf postgresql-15.2.tar.bz2
# cd postgresql-15.2
# ls -l
Sample Output
total 780
-rw-r--r-- 1 1107 1107 397 Feb 6 16:39 aclocal.m4
drwxrwxrwx 2 1107 1107 4096 Feb 6 16:50 config
-rwxr-xr-x 1 1107 1107 601519 Feb 6 16:39 configure
-rw-r--r-- 1 1107 1107 89258 Feb 6 16:39 configure.ac
drwxrwxrwx 61 1107 1107 4096 Feb 6 16:50 contrib
-rw-r--r-- 1 1107 1107 1192 Feb 6 16:39 COPYRIGHT
drwxrwxrwx 3 1107 1107 87 Feb 6 16:50 doc
-rw-r--r-- 1 1107 1107 4264 Feb 6 16:39 GNUmakefile.in
-rw-r--r-- 1 1107 1107 277 Feb 6 16:39 HISTORY
-rw-r--r-- 1 1107 1107 63842 Feb 6 16:51 INSTALL
-rw-r--r-- 1 1107 1107 1875 Feb 6 16:39 Makefile
-rw-r--r-- 1 1107 1107 1213 Feb 6 16:39 README
drwxrwxrwx 16 1107 1107 4096 Feb 6 16:51 src
4. Next step for the installation procedure is to configure the downloaded source code by choosing the options according to your needs. Use ./configure --help to get help with various options.
# ./configure --help `configure' configures PostgreSQL 15.2 to adapt to many kinds of systems. Usage: ./configure [OPTION]... [VAR=VALUE]... To assign environment variables (e.g., CC, CFLAGS...), specify them as
VAR=VALUE. See below for descriptions of some of the useful variables. Defaults for the options are specified in brackets. Configuration: -h, --help display this help and exit --help=short display options specific to this package --help=recursive display the short help of all the included packages -V, --version display version information and exit -q, --quiet, --silent do not print `checking ...' messages --cache-file=FILE cache test results in FILE [disabled] -C, --config-cache alias for `--cache-file=config.cache' -n, --no-create do not create output files --srcdir=DIR find the sources in DIR [configure dir or `..'] Installation directories: --prefix=PREFIX install architecture-independent files in PREFIX [/usr/local/pgsql] --exec-prefix=EPREFIX install architecture-dependent files in EPREFIX [PREFIX]
....
5. Now create a directory where you want to install postgres files and use the prefix option with configure.
# mkdir /opt/PostgreSQL
# ./configure --prefix=/opt/PostgreSQL
Sample Output
checking build system type... x86_64-pc-linux-gnu
checking host system type... x86_64-pc-linux-gnu
checking which template to use... linux
checking whether NLS is wanted... no
checking for default port number... 5432
checking for block size... 8kB
checking for segment size... 1GB
checking for WAL block size... 8kB
checking for gcc... gcc
checking whether the C compiler works... yes
checking for C compiler default output file name... a.out
checking for suffix of executables... checking whether we are cross compiling... no
checking for suffix of object files... o
checking whether we are using the GNU C compiler... yes
checking whether gcc accepts -g... yes
checking for gcc option to accept ISO C89... none needed
checking for gcc option to accept ISO C99... none needed
checking for g++... g++
checking whether we are using the GNU C++ compiler... yes
checking whether g++ accepts -g... yes
checking for gawk... gawk
checking whether gcc supports -Wdeclaration-after-statement, for CFLAGS... yes
checking whether gcc supports -Werror=vla, for CFLAGS... yes
checking whether gcc supports -Werror=unguarded-availability-new, for CFLAGS... no
....
Building PostgreSQL from Source
6. After configuring, next we will start to build postgreSQL using the following make command.
# make
After the build process finishes, now install postgresql using the following command.
# make install
Postgresql 15 has been installed in /opt/PostgreSQL directory.
Creating Postgres User
7. Now create a postgres user and directory to be used as a data directory for initializing the database cluster. The owner of this data directory should be a postgres user and permissions should be 700 and also set a path for postgresql binaries for our ease.
# useradd postgres
# passwd postgres
# mkdir -p /pgdatabase/data
# chown -R postgres. /pgdatabase/data
# echo 'export PATH=$PATH:/opt/PostgreSQL/bin' > /etc/profile.d/postgres.sh
# source /etc/profile.d/postgres.sh
Initializing Postgres Database
8. Now initialize the database using the following command as a postgres user before using any postgres commands.
# su postgres
$ initdb -D /pgdatabase/data/ -U postgres -W
Where -D is the location for this database cluster or we can say it is the data directory where we want to initialize the database cluster, -U for database superuser name and -W for password prompt for db superuser.
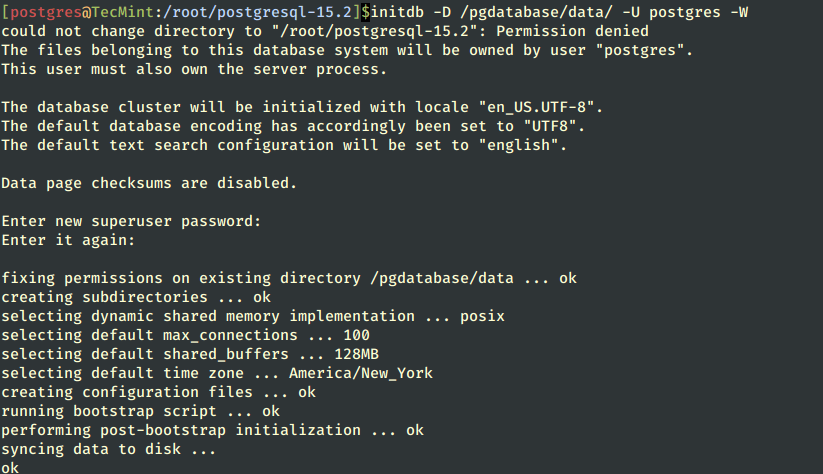
For more info and options we can refer to initdb --help.
9. After initializing the database, start the database cluster, or if you need to change the port or listen to the address for the server, edit the /pgdatabase/data/postgresql.conf file in the data directory of the database server.

$ pg_ctl -D /pgdatabase/data/ start

10. After starting the database, verify the status of the postgres server process by using the following ps and netstat commands.
$ ps -ef |grep -i postgres
$ netstat -apn |grep -i 51751
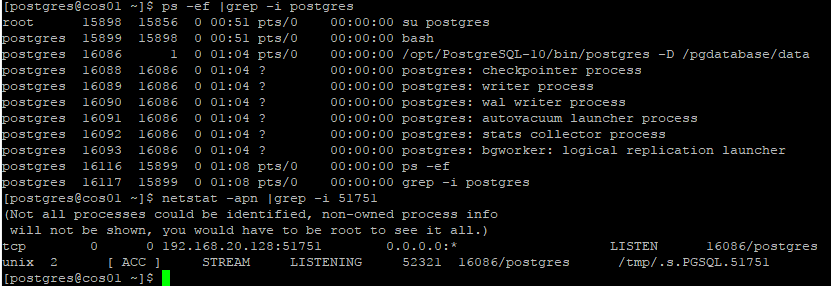
We can see that the database cluster is running fine, and startup logs can be found at the location specified with -l option while starting the database cluster.
11. Now connect to the database cluster and create a database by using the following commands.
$ psql -p 51751
postgres=# create database test;
postgres=# l to list all databases in cluster
postgres=# q to quit form postgres console

That’s It! In our upcoming articles, I will cover configuration, replication setup, and installation of the pgAdmin tool, till then stay tuned to Tecmint.


