How to Increase Swap Memory in Ubuntu Linux
One of the simplest ways of watching against out-of-memory problems in applications is to increase some swap size in your server. In this article, we will explain how to add a swap file to an Ubuntu server.
Step 1: Checking Swap Information
Before we start, first make sure to check if the system already has swap space available by running the following swapon command.
$ sudo swapon --show

If you don’t see any output, that means your system doesn’t have swap space available currently.
You can also confirm that there is no swap space available using the free command.
$ free -h

You can see from the above output, that there is no active swap on the system.
Step 2: Checking Available Space on the Partition
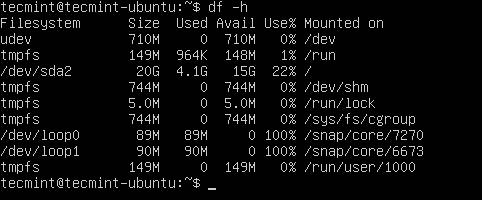
To create a swap space, first, you need to check your current disk usage and confirm that there is enough space to create a swap file on the system.
$ df -h

The partition with / has enough space available to create a swap file.
Step 3: Creating a Swap File in Ubuntu
Now we will create a swap file called "swap.img" on our Ubuntu root (/) directory using the fallocate command with the size of 1GB (you can adjust the size as per your needs) and verify the size of the swap using the ls command as shown.
$ sudo fallocate -l 1G /swap.img
$ ls -lh /swap.img

From the above output, you can see that we’ve created the swap file with the correct amount of space i.e. 1GB.
Step 4: Enabling the Swap File in Ubuntu
To enable the swap file in Ubuntu, first, you need to set the correct permissions on the file so that only the root user has access to the file.
$ sudo chmod 600 /swap.img
$ ls -lh /swap.img

From the above output, you can see that only the root user has read and write permissions.
Now run the following commands to mark the file as swap space and enable the swap file to start utilizing it on the system.
$ sudo mkswap /swap.img
$ sudo swapon /swap.img

Verify that the swap space is available by running the following commands.
$ sudo swapon --show
$ free -h

From the above output, it is clear that our new swap file has been created successfully and our Ubuntu system will start to use it as necessary.
Step 5: Mount the Swap File Permanent in Ubuntu
To make the swap space permanent, you need to add the swap file information in the /etc/fstab file and verify it by running the following commands.
$ echo '/swap.img none swap sw 0 0' | sudo tee -a /etc/fstab
$ cat /etc/fstab

Step 6: Tuning Swap Settings in Ubuntu
There are a few settings that you need to configure that will have an effect on your Ubuntu’s performance when using the swap.
Adjusting the Swappiness Value
Swappiness is a Linux kernel parameter that specifies how much (and how often) your system swaps data out of RAM to the swap space. The default value for this parameter is “60” and it can use anything from “0” to “100”. The higher the value, the higher the usage of swap space by Kernel.
First, check the current swappiness value by typing the following command.
$ cat /proc/sys/vm/swappiness

The current swappiness value of 60 is perfect for Desktop usage, but for a server, you must set it to lower value i.e. 10.
$ sudo sysctl vm.swappiness=10
To make this setting permanent, you need to add the following line to the /etc/sysctl.conf file.
vm.swappiness=10
Adjusting the Cache Pressure Setting
Another similar setting that you may want to alter is the vfs_cache_pressure – this setting specifies how much the system will want to cache inode and dentry details over other data.
You can check the current value by querying the proc filesystem.
$ cat /proc/sys/vm/vfs_cache_pressure

The current value is set to 100, which means our system removes inode information from the cache too rapidly. I suggest we should set this to a more stable setting like 50.
$ sudo sysctl vm.vfs_cache_pressure=50
To make this setting permanent, you need to add the following line to the /etc/sysctl.conf file.
vm.vfs_cache_pressure=50
Save and close the file when you are done.
Step 7: Removing a Swap File in Ubuntu
To remove or delete the newly created swap file, run the following commands.
$ sudo swapoff -v /swap.img
$ sudo rm -rf /swap.img

Finally, delete the swap file entry from the /etc/fstab file.
That’s all! In this article, we have explained how to create a swap file on your Ubuntu distribution. If you have any queries regarding this article, feel free to ask your questions in the comment section below.


