Angular CLI – How to Create a New Angular Project in Linux
Angular is an open-source, popular, and highly-extensible front-end application development framework, used for building mobile and web applications using TypeScript/JavaScript and other common languages.
Angular is an umbrella term for all Angular versions that come after AngularJS (or Angular version 1.0) including Angular 2, and Angular 4.
Angular is well suited for building small to large-scale applications from scratch. One of the key components of the Angular platform to aid application development is the Angular CLI utility – it is a simple and easy-to-use command-line tool used to create, manage, build, and test Angular applications.
In this article, we will explain how to install the Angular command-line tool on a Linux system and learn some basic examples of this tool.
Installing Node.js in Linux
To install Angular CLI, you need to have the latest version of Node.js and NPM installed on your Linux system.
Install Node.js on Ubuntu
------------- For Node.js v19.x -------------
$ curl -fsSL https://deb.nodesource.com/setup_19.x | sudo -E bash - &&
$ sudo apt-get install -y nodejs

------------- For Node.js v18.x -------------
$ curl -fsSL https://deb.nodesource.com/setup_18.x | sudo -E bash - &&
$ sudo apt-get install -y nodejs

------------- For Node.js v16.x -------------
$ curl -fsSL https://deb.nodesource.com/setup_16.x | sudo -E bash - &&
$ sudo apt-get install -y nodejs

------------- For Node.js v14.x -------------
$ curl -fsSL https://deb.nodesource.com/setup_14.x | sudo -E bash - &&
$ sudo apt-get install -y nodejs
Install Node.js on Debian
------------- For Node.js v19.x -------------
$ curl -fsSL https://deb.nodesource.com/setup_19.x | bash - &&
$ sudo apt-get install -y nodejs

------------- For Node.js v18.x -------------
$ curl -fsSL https://deb.nodesource.com/setup_18.x | bash - &&
$ sudo apt-get install -y nodejs

------------- For Node.js v16.x -------------
$ curl -fsSL https://deb.nodesource.com/setup_16.x | bash - &&
$ sudo apt-get install -y nodejs

------------- For Node.js v14.x -------------
$ curl -fsSL https://deb.nodesource.com/setup_14.x | bash - &&
$ sudo apt-get install -y nodejs
Install Node.js on RHEL, CentOS, Fedora, Rocky & Alma Linux
------------- For Node.js v19.x -------------
$ curl -fsSL https://rpm.nodesource.com/setup_19.x | sudo bash -
$ sudo yum install -y nodejs

------------- For Node.js v18.x -------------
$ curl -fsSL https://rpm.nodesource.com/setup_18.x | sudo bash -
$ sudo yum install -y nodejs

------------- For Node.js v16.x -------------
$ curl -fsSL https://rpm.nodesource.com/setup_16.x | sudo bash -
$ sudo yum install -y nodejs

------------- For Node.js v14.x -------------
$ curl -fsSL https://rpm.nodesource.com/setup_14.x | sudo bash -
$ sudo yum install -y nodejs
Also, to compile and install native add-ons from NPM you may need to install development tools on your system as follows.
$ sudo apt install -y build-essential  [On Debian/Ubuntu]
$ sudo yum install gcc-c++ make        [On RHEL Systems]
Installing Angular CLI in Linux
Once you have Node.js and NPM installed, as shown above, you can install Angular CLI using the npm package manager as follows (the -g flag means to install the tool system-wide to be used by all system users).
# npm install -g @angular/cli
OR
$ sudo npm install -g @angular/cli

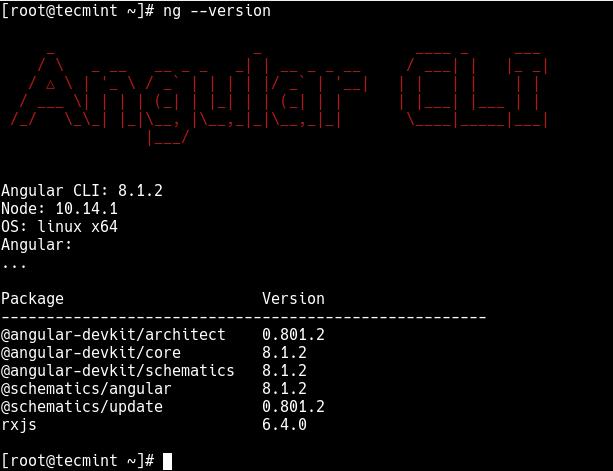
You can launch the Angular CLI using the ng executable which should now be installed on your system. Run the following command to check the version of Angular CLI installed.
# ng version
OR
# ng --version
Creating an Angular Project Using Angular CLI
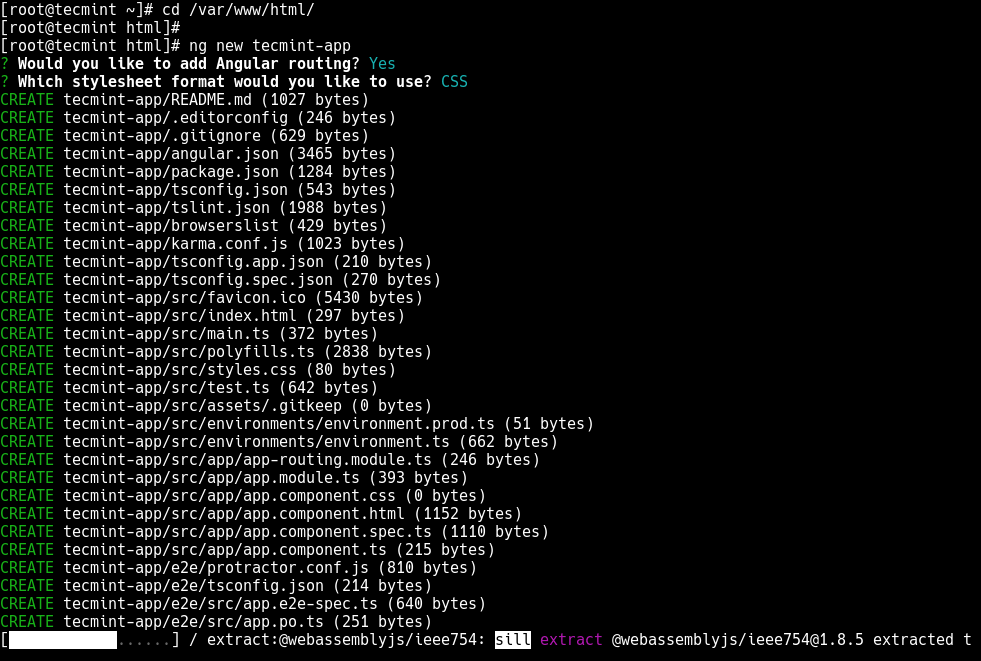
In this section, we will show how to create, build, and serve a new, basic Angular project. First, move into the webroot directory of your server, then initialize a new Angular application as follows (remember to follow the prompts):
# cd /var/www/html/
# ng new tecmint-app			#as root
OR
$ sudo ng new tecmint-app		#non-root user
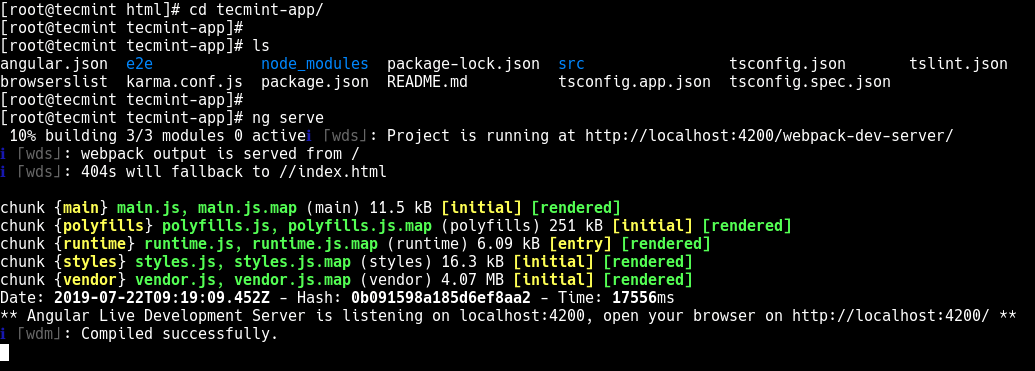
Next, move into the application directory which has just been created, and serve the application as shown.
# cd tecmint-app
# ls 			#list project files
# ng serve
Before you can access your new app from a web browser, if you have a firewall service running, you need to open port 4200 in the firewall configuration as shown.
---------- On Firewalld ----------
# firewall-cmd --permanent --zone=public --add-port=4200/tcp
# firewall-cmd --reload

---------- On UFW ----------
$ sudo ufw allow 4200/tcp
$ sudo ufw reload
Now you can open a web browser and navigate using the following address to see the new app run as shown in the following screenshot.
http://localhost:4200/
or
http://SERVER_IP:4200
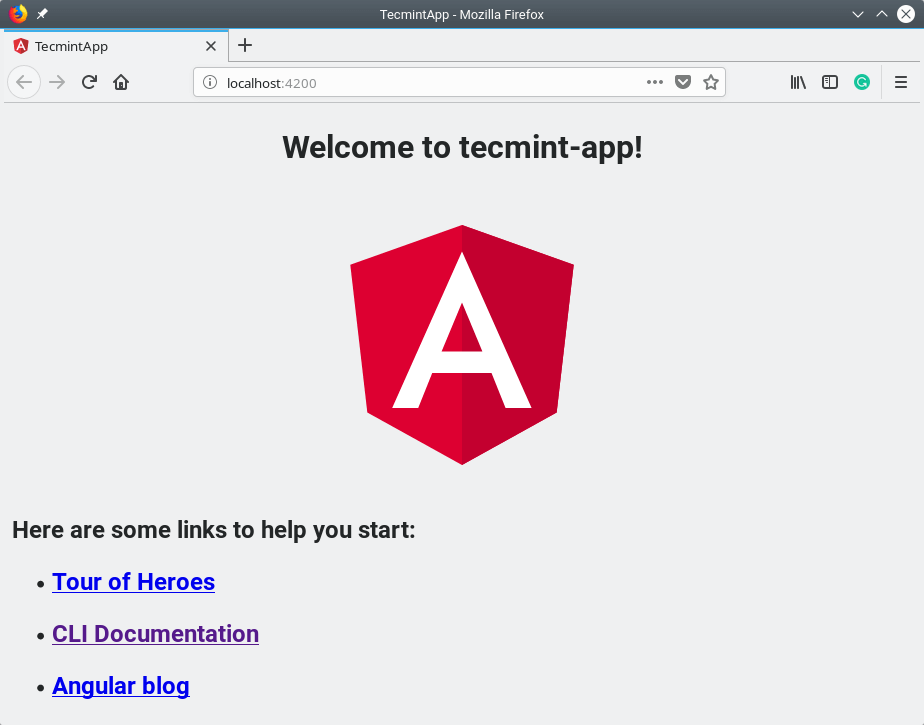
Note: If you use the command ng serve to build an application and serve it locally, as shown above, the server automatically rebuilds the app and reloads the web page(s) when you change any of the source files.
For more information concerning the ng tool, run the following command.
# ng help
The Angular CLI Homepage: https://angular.io/cli
In this article, we have shown how to install Angular CLI on different Linux distributions. We also covered how to build, compile, and serve a basic Angular application on a development server. For any queries or thoughts, you want to share with us, use the feedback form below.

![How to Annotate PDFs in Linux [Beginner's Guide]](https://webomate.net/wp-content/uploads/2023/08/how-to-annotate-pdfs-in-linux-beginners-guide-768x501.png)
