How To Encrypt Root Filesystem on Linux
As a system administrator, you probably already know how important it is to encrypt your disks.
If your laptop were to be stolen, even a novice hacker would be able to extract the information contained on the disks.
All it takes is a simple USB stick with a LiveCD on it and everything would be stolen.
Luckily for you, there are ways for you to prevent this from happening : by encrypting data stored on your disks.
In this tutorial, we are going to see the steps needed in order to perform a full system encryption. You may find other tutorials online focused on encrypting just a file or home partitions for example.
In this case, we are encrypting the entire system meaning the entire root partition and the boot folder. We are going to encrypt a part of the bootloader.
Ready?
Table of Contents
“sudo“ group (for Debian based distributions) or “wheel“ (on RedHat based ones).

If you see the following output, you should be good to go.
Before continuing, it is important for you to know that encrypting disks doesn’t come without any risks.
The process involves formatting your entire disk meaning that you will lose data if you don’t back it up. As a consequence, it might be a good idea for you to backup your files, whether you choose to do it on an external drive or in an online cloud.
If you are not sure about the steps needed to backup your entire system, I recommend that you read the following tutorial that explains it in clear terms.
Now that everything is set, we can begin encrypting our entire system.
Identify your current situation
This tutorial is divided into three parts : one for each scenario that you may be facing.
After identifying your current situation, you can directly navigate to the chapter that you are interested about.
If you want to encrypt a system that already contains unencrypted data, you have two choices :
- You can add an additional disk to your computer or server and configure it to become the bootable disk : you can go to the part one.
- You cannot add an additional disk to your computer (a laptop under warranty for example) : you will find the information needed on part two.
If you are installing a brand new system, meaning that you install the distribution from scratch, you may encrypt your entire disk directly from the graphical installer. As a consequence, you can go to part three.
Design Hard Disk Layout
Whenever you are creating new partitions, encrypted or not, it is quite important to choose the hard disk design ahead of time.
In this case, we are going to design our disk using a MBR layout : the first 512 bytes of the bootable disk will be reserved for the first stage of the GRUB (as well as metadata for our partitions).
The first partition will be an empty partition reserved for systems using EFI (or UEFI) as the booting firmware. If you choose to install Windows 10 in the future, you will have a partition already available for that.
The second partition of our disk will be formatted as a LUKS-LVM partition containing one physical volume (the disk partition itself) as well as one volume group containing two logical volumes : one for the root filesystem and another one for a small swap partition.
As you can see, the second stage of the GRUB will be encrypted too : this is because we chose to have the boot folder stored on the same partition.
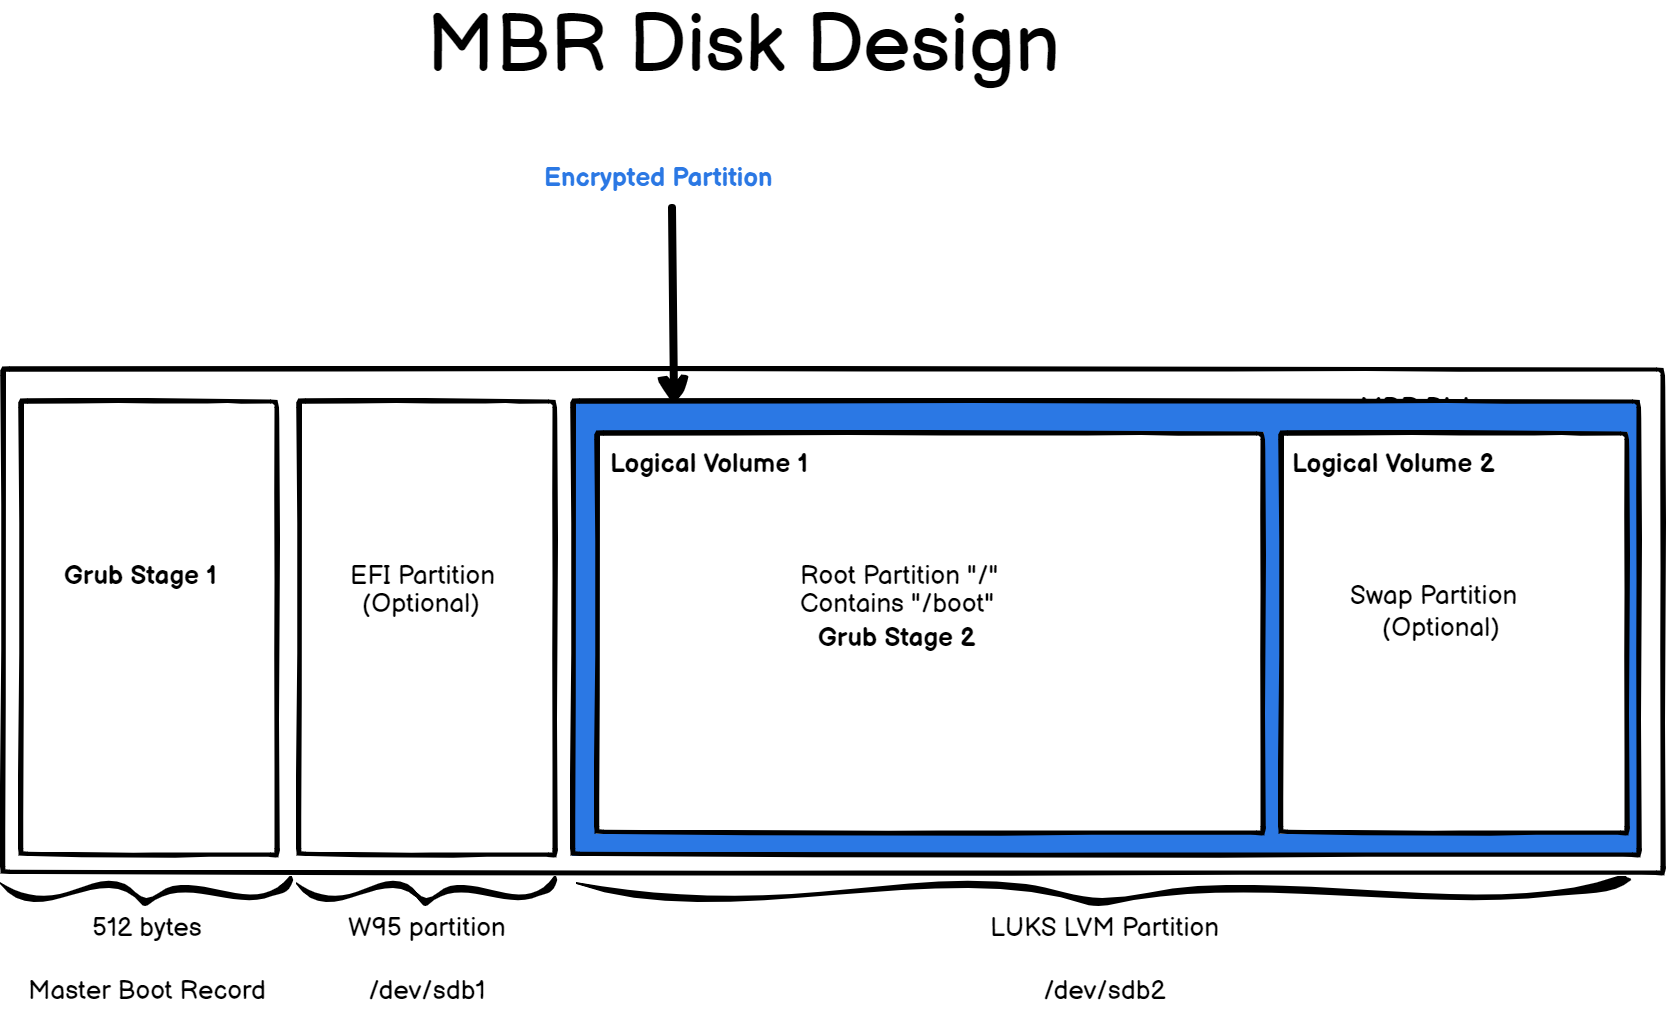
Of course, you are not limited to the design provided here, you can add additional logical volumes for your logs for example.
This design will be our roadmap for this tutorial : we are going to start from a brand new disk and implement all the parts together.
Data-at-rest encryption
This tutorial focuses on data-at-rest encryption. As its name states, data-at-rest encryption means that your system is encrypted, i.e nobody can read from it, when it is resting or powered off.
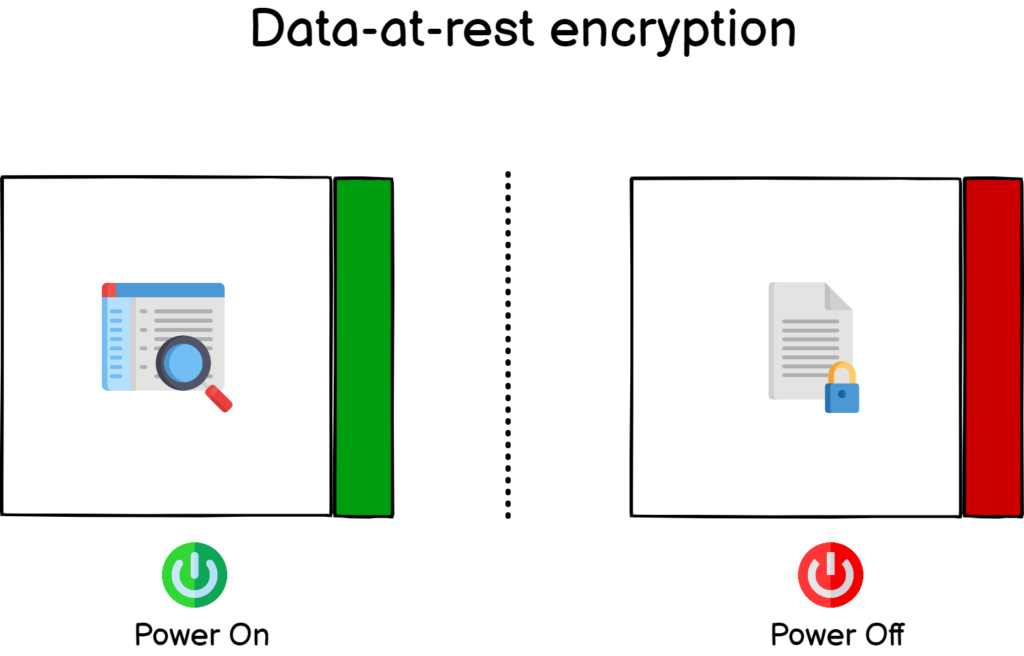
This encryption is quite useful if your computer were to be stolen, hackers would not be able to read data on the disk unless they know about the passphrase that you are going to choose in the next sections.
However, there would still be a risk that your data is erased forever : having no read access to a disk does not mean that they cannot simply remove partitions on it.
As a consequence, make sure that you keep a backup of your important files somewhere safe.
Encrypting Root Filesystem on New Disk
As detailed during the introduction, we are going to encrypt the root filesystem from a new disk that does not contain any data at all. This is quite important because the encrypted disk will be formatted in the process.
Head over to the system that you want to encrypt and plug the new disk. First of all, identify your current disk, which is probably named “/dev/sda” and the disk that you just plugged in (probably named “/dev/sdb”).
If you have any doubts about the correspondence between names and disk serials, you can append vendors and serials with the “-o” option of lsblk.
$ lsblk -do +VENDOR,SERIAL
In this case, the disk with data is named “/dev/sda” and the new one is named “/dev/sdb”.
First of all, we need to create the layout we specified in the introduction, meaning one partition that is going to be a EFI one and one LUKS-LVM partition.
Creating Basic Disk Layout
The first step on our journey towards full disk encryption starts with two simple partitions : one EFI (even if we use MBR, in case you want to change in the future) and one for our LVM.
To create new partitions on your disk, use the “fdisk” command and specify the disk to be formatted.
$ sudo fdisk /dev/sdbAs explained in the introduction, the first partition will be a 512 Mb one and the other one will take the remaining space on the disk.
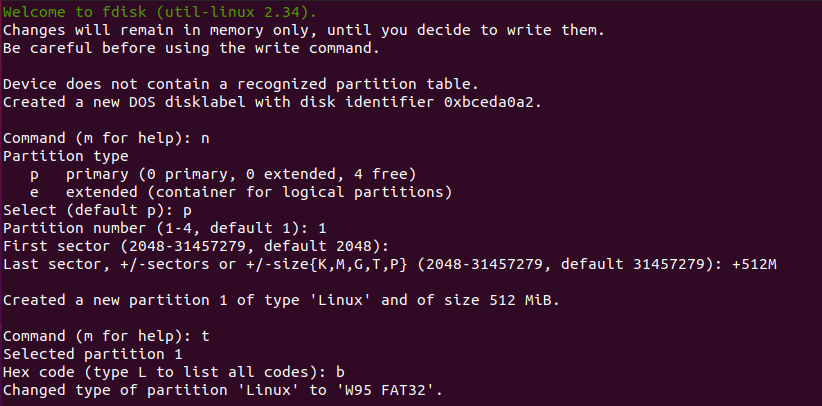
In the “fdisk” utility, you can create a new partition with the “n” option and specify a size of 512 megabytes with “+512M“.
Make sure to change the partition type to W95 FAT32 using the “t” option and specifying “b” as the type.
Awesome, now that you have your first partition, we are going to create the one we are interested in.
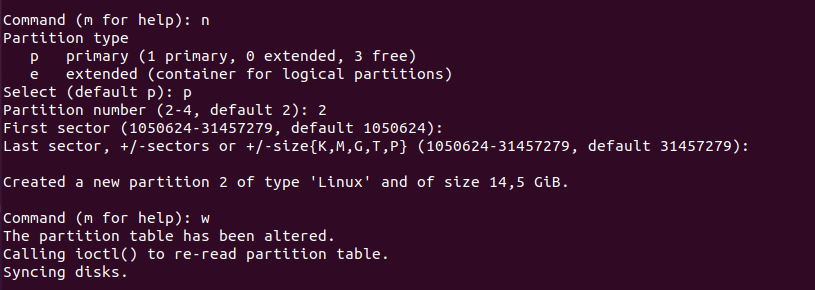
Creating the second partition is even simpler.
In the fdisk utility, use “n” in order to create a new partition and stick with the defaults, meaning that you can press “Enter” on every steps.
When you are done, you can simply press “w” in order to write the changes to disk.
Now, executing the “fdisk” command again will give you a good idea of the changes that you performed on the disk.
$ sudo fdisk -l /dev/sdb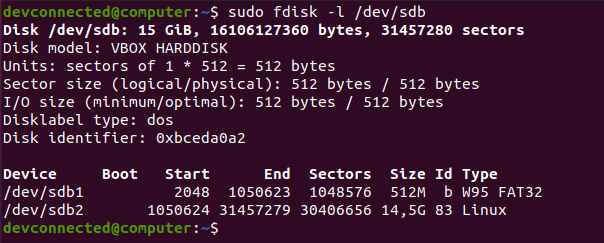
Great!
Your second partition is ready to be formatted so let’s head to it.
Creating LUKS & LVM partitions on disk
In order to encrypt disks, we are going to use LUKS, short for the Linux Unified Key Setup project.
LUKS is a specification for several backends implemented in some versions of the Linux kernel.
In this case, we are going to use the “dm-crypt” submodule of the Linux storage stack.
As its names states, “dm-crypt” is part of the device mapper module that aims at creating a layer of abstraction between your physical disks and the way you choose to design your storage stack.

This information is quite important because it means that you can encrypt pretty much every device using the “dm-crypt” backend.
In this case, we are going to encrypt a disk, containing a set of LVM partitions, but you may choose to encrypt a USB memory stick or a floppy disk.
In order to interact with the “dm-crypt” module, we are going to use the “cryptsetup” command.
Obviously, you may need to install it on your server if you don’t have it already.
$ sudo apt-get instal cryptsetup $ which cryptsetup
Now that the cryptsetup is available on your computer, you will create your first LUKS-formatted partition.
To create a LUKS partition, you are going to use the “cryptsetup” command followed by the “luksFormat” command that formats the specified partition (or disk).
$ sudo cryptsetup luksFormat --type luks1 /dev/sdb2Note : so why are we specifying the LUKS1 formatting type? As of January 2021, GRUB (our bootloader) does not support LUKS2 encryption. Make sure to leave a comment if you notice that LUKS2 is now released for the GRUB bootlader.

As you can see, you are notified that this operation will erase all data stored on the disk. Check the disk that you are formatting one last time, and type “YES” when you are ready.
Right after, you are prompted with a passphrase. LUKS uses two authentication methods : a passphrase based one which is essentially a password that you enter on decryption.
LUKS can also use keys. Using keys, you can for example store it on a part of your disk and your system will be able to look after it automatically.
Choose a strong passphrase, enter it again and wait to the disk encryption to complete.

When you are done, you can check with the “lsblk” command that your partition is now encrypted as a LUKS one.
Awesome! You now have an encrypted partition.
$ lsblk -f
To check that your partition is correctly formatted, you can use the “cryptsetup” command followed by the “luksDump” option and specify the name of the encrypted device.
$ sudo cryptsetup luksDump /dev/sdb2
Your version should be set to “1” for the “LUKS1” format and you should see below the encrypted passphrase in one of the keyslots.
Creating Encrypted LVM on disk
Now that your LUKS encrypted partition is ready, you can “open” it. “Opening” an encrypted partition simply means that you are going to access data on the disk.
To open your encrypted device, use the “cryptsetup” command followed by “luksOpen”, the name of the encrypted device and a name.
$ sudo cryptsetup luksOpen <encrypted_device> <name>
In this case, we chose to name the device “cryptlvm“.
As a consequence, using the “lsblk” command again, you can see that a new device was added to the existing device list. The second partition now contains a device named “cryptlvm” which is your decrypted partition.
Now that everything is ready, we can start creating our two LVM : one for our root partition and one for swap.
First of all, we are going to create a physical volume for our new disk using the “pvcreate” command.
# Optional, if you don't have LVM commands : sudo apt-get install lvm2 $ sudo pvcreate /dev/mapper/cryptlvm
Now that your physical volume is ready, you can use it to create a volume group named “cryptvg“.
$ sudo vgcreate cryptvg /dev/mapper/cryptlvm
Now that your volume group is ready, you can create your two logical volumes.
In this case, the first partition is a 13Gb one and the swap partition will take the remaining space. Make sure to modify those numbers for your specific case.
In order to host our root filesystem, we are going to create an EXT4 filesystem on the logical volume.
$ sudo lvcreate -n lvroot -L 13G cryptvg $ sudo mkfs.ext4 /dev/mapper/cryptvg-lvroot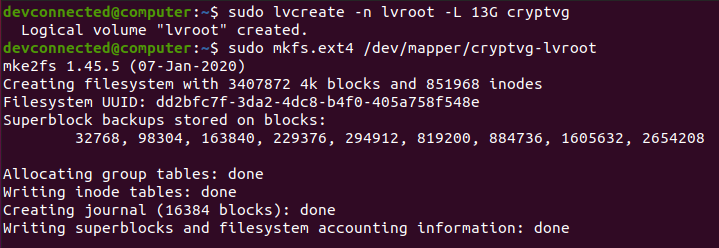
Creating the swap partition can be achieved using the same steps, using the “lvcreate” and the “mkswap” one.
$ sudo lvcreate -n lvswap -l 100%FREE cryptvg $ sudo mkswap /dev/mapper/cryptvg-lvswap
Awesome! Now that your partitions are created, it is time for you to transfer your existing rootfilesystem on the newly created one.
Transfer Entire Filesystem to Encrypted Disk
Before transferring your entire filesystem, it might be a good idea to check that you have enough space on the destination drive.
$ df -h In order to transfer your entire filesystem to your newly created partition, you are going to use the “rsync” command.
Mount your newly created logical volume and start copying your files and folders recursively to the destination drive.
$ sudo mount /dev/mapper/cryptvg-lvroot /mnt $ sudo rsync -aAXv / --exclude="mnt" /mnt --progressThis process can take quite some time depending on the amount of data that you have to transfer.
After a while, your entire filesystem should be copied to your encrypted drive. Now that the “/boot” is encrypted, you will need to re-install the stage 1 of the GRUB accordingly.
Install and Configure GRUB Bootloader
So, why would you need to re-install and re-configure your GRUB accordingly?
To answer this question, you need to have a basic idea of the way your system boots up when using a BIOS/MBR conventional booting process.
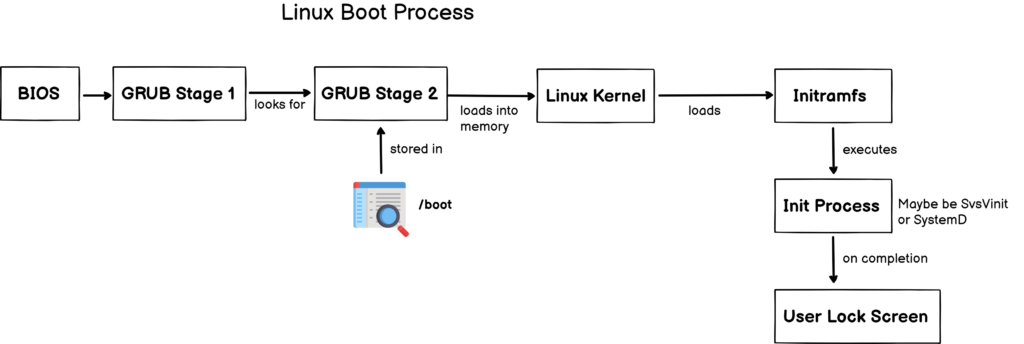
As explained in the introduction, GRUB is split into two (sometimes three) parts : GRUB stage 1 and GRUB stage 2. The stage 1 will only look for the location of the stage 2, often located in the “/boot” folder of your filesystem.
The stage 2 is responsible for many tasks : loading the necessary modules, loading the kernel into memory and starting the the initramfs process.
As you understood, the stage 2 is encrypted here, so we need to tell the stage 1 (located in the first 512 bytes of your disk) that it needs to be decrypted first.
Re-install GRUB Stage 1 & 2
In order to reinstall the first stage of the GRUB, you first need to enable the “cryptomount” that enables access to encrypted devices in the GRUB environment.
To achieve that, you need to edit the “/etc/default/grub” file and add the “GRUB_ENABLE_CRYPTODISK=y” option.
However, you are currently sitting on the system that you are trying to encrypt. As a consequence, you will need to chroot into your new drive in order to execute the commands properly.
Chroot in Encrypted Drive
To chroot into your encrypted drive, you will have to execute the following commands.
$ sudo mount --bind /dev /mnt/dev
$ sudo mount --bind /run /mnt/run $ sudo chroot /mnt/ $ sudo mount --types=proc proc /proc
$ sudo mount --types=sysfs sys /sys
Now that you executed those commands, you should now be in the context of your encrypted drive.
$ vi /etc/default/grub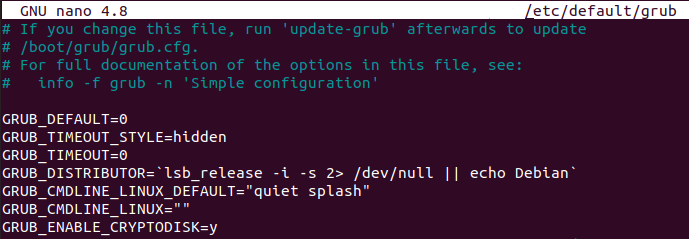
GRUB_ENABLE_CRYPTODISK=yAs stated in the GRUB documentation, this option will configure the GRUB to look for encrypted devices and add additional commands in order to decrypt them.
Now that the stage 1 is configured, you can install it on your MBR using the grub-install command.
$ grub-install --boot-directory=/boot /dev/sdbNote : be careful, you need to specify “/dev/sdb” and not “/dev/sdb1”.

As you probably noticed, when providing no options for the GRUB installation, you have by default an “i386-pc” installation (which is designed for a BIOS-based firmware).
Re-install GRUB Stage 2
Using the steps detailed above, the stage 1 has been updated but we also need to tell the stage 2 that it is dealing with an encrypted disk.
To achieve that, head over to the “/etc/default/grub” and add another line for your GRUB stage 2.
GRUB_CMDLINE_LINUX="cryptdevice=UUID=<encrypted_device_uuid> root=UUID=<root_fs_uuid>"This is an important line because it tells the second stage of the GRUB where the encrypted drive is and where the root partition is located.
To identify the UUIDs needed, you can use the “lsblk” command with the “-f” option.
$ lsblk -f 
Using those UUIDs, we would add the following line to the GRUB configuration file.
GRUB_CMDLINE_LINUX="cryptdevice=UUID=1b9a0045-93d5-4560-a6f7-78c07e1e15c4 root=UUID=dd2bfc7f-3da2-4dc8-b4f0-405a758f548e"To update your current GRUB installation, you can use the “update-grub2” command in your chrooted environment.
$ sudo update-grub2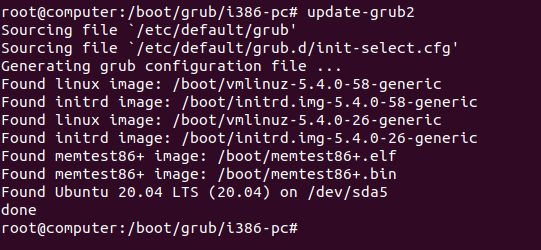
Now that you updated your GRUB installation, your GRUB menu (i.e the stage 2) should be modified and you should see the following content when inspecting the “/boot/grub/grub.cfg” file.

As you can see, the GRUB configuration file was modified and your system is now using “cryptomount” in order to locate the encrypted drive.
For your system to boot properly, you need to check that :
- You are loading the correct modules such as cryptodisk, luks, lvm and others;
- The “cryptomount” instruction is correctly set;
- The kernel is loaded using the “cryptdevice” instruction we just set in the previous section.
- The UUID specified are correct : the “cryptdevice” one is pointing to the LUKS2 encrypted partition and the “root” one to the ext4 root filesystem.
Modify crypttab and fstab files
One of the first steps of initramfs will be to mount your volumes using the “/etc/crypttab” and “/etc/fstab” files on the filesystem.
As a consequence, and because you creating new volumes, you may have to modify those files in order to put the correct UUID in them.
First of all, head over to the “/etc/crypttab” file (you can create it if it does not exist already) and add the following content
$ nano /etc/crypttab # <target name> <source device> <key file> <options> cryptlvm UUID=<luks_uuid> none luks
If you are not sure about the UUID of your encrypted device, you can use the “blkid” to get the information.
$ blkid | grep -i LUKS Now that the crypttab file is modified, you only need to modify the fstab accordingly.
$ nano /etc/fstab # <file system> <mount point> <type> <options> <dump> <pass>
UUID=<ext4 uuid> / ext4 errors=remount-ro 0 1
Again, if you are not sure about the UUID of your ext4 filesystem, you can use the “blkid” command again.
$ blkid | grep -i ext4Almost done!
Now that your GRUB and configuration files are correctly configured, we only need to configure the initramfs image.
Re-configure initramfs image
Among all the boot scripts, initramfs will look for the root filesystem you specified in the previous chapter.
However, in order to decrypt the root filesystem, it will need to invoke the correct initramfs modules, namely the “cryptsetup-initramfs” one. In your chrooted environment, you can execute the following command :
$ apt-get install cryptsetup-initramfs In order to include the cryptsetup modules in your initramfs image, make sure to execute the “update-initramfs” command.
$ update-initramfs -u -k allThat’s it!
You have successfully assembled all the needed pieces in order to create a fully encrypted disk on your system. You can now reboot your computer and have a look at your new boot process.
Boot on Encrypted Device
When booting, the first screen that you will see is the first stage of the GRUB trying to decrypt the second stage of the GRUB.

If you see this password prompt, it means that you don’t have any errors in your stage 1 configuration.
Note : be aware that this screen may not follow your usual keyboard layout. As a consequence, if you have an incorrect password prompt, you should try pretending that you have a US keyboard or an AZERTY one for example.
When providing the correct password, you will be presented with the GRUB menu.
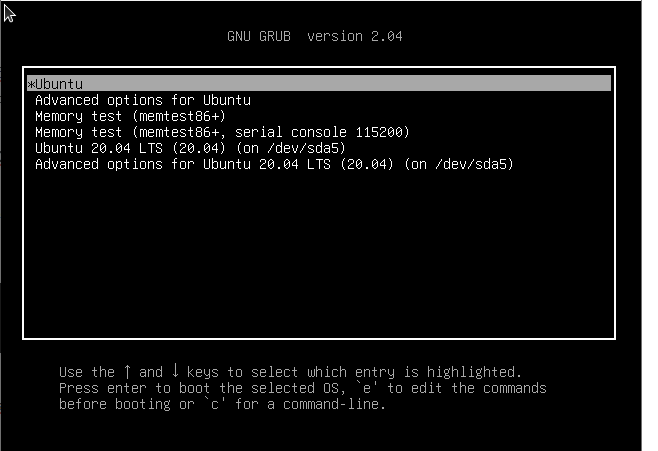
If you see this screen, it means that your stage 1 was able to open the stage 2. You can select the “Ubuntu” option and boot on your system.
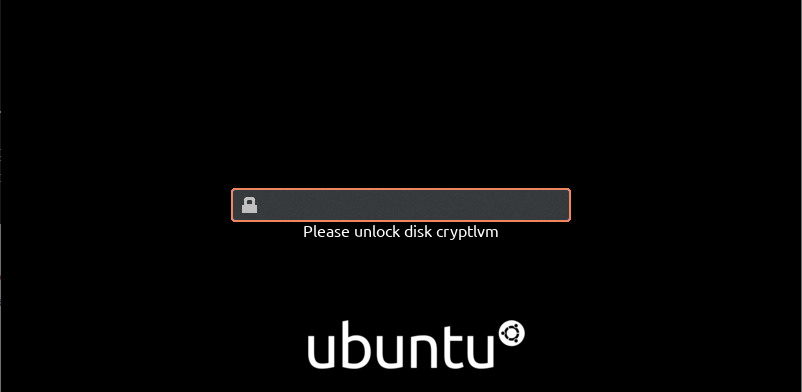
On the next screen, you are asked to provide the passphrase again.
This is quite normal because your boot partition is encrypted. As a consequence, you need one passphrase in order to unlock the stage 2 and one to unlock the entire root filesystem.
Luckily, there is a way to avoid that : by having a key file embedded in the initramfs image. For that, ArchLinux contributors wrote an excellent tutorial on the subject.
In this case, we are just going to provide the passphrase and press Enter.
After a while, when the init process is done, you should be presented with the lock screen of your user interface!
Congratulations, you successfully encrypted an entire system on Linux!

Encrypting Root Filesystem on Existing Disk
In some cases, you may have to encrypt an existing disk without the capability of removing one of the disks on your computer. This case may happen if you have a disk under warranty for example.
In this case, the process is quite simple :
- Make a bootable USB (or removable device) containing an ISO of the distribution of your choice;
- Use the device in order to boot and log into a LiveCD of your distribution;
- From the LiveCD, identify the hard disk containing your root distribution and make a backup of it;
- Mount the primary partition on the folder of your choice and follow the instructions of the previous chapter;
So why do you need to use a LiveCD if you want to encrypt a non-removable disk?
If you were to encrypt your main primary disk, you would have to unmount it. However, as it is the root partition of your system, you would not be able to unmount it, as a consequence you have to use a LiveCD.
Encrypting Root Filesystem From Installation Wizard
In some cases, some distributors embed the encryption process right into the installation wizard.
If you are not looking to transfer an existing filesystem from one system to another, you might be tempted to use this option.
Taking Ubuntu 20.04 as an example, the installation process suggests disk encryption in the disk configuration wizard.
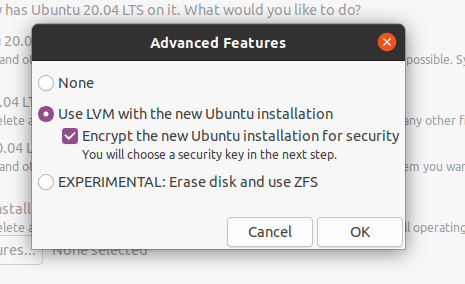
If you select this option, you will have a similar setup to the one done in the previous sections. However, most distributions choose not to encrypt the “/boot” folder.
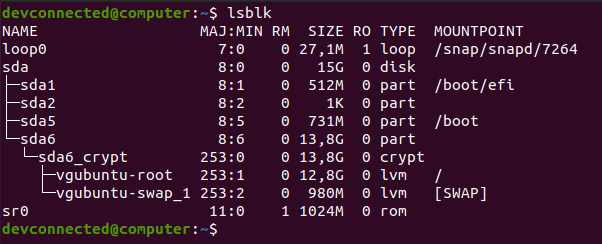
If you want to encrypt the “/boot” folder, we recommend that you read the first section of this tutorial.
Troubleshooting
As open-source changes constantly, there is a chance that you are not able to boot your system, even if you followed the steps of this tutorial carefully.
However, as error sources are probably infinite and specific to every user, there would be no point enumerating every single issue that you can encouter.
However, most of the time, it is quite important to know on which step of the boot process you are failing.
If you see a screen with a “grub rescue” prompt, it probably means that you are stuck on the stage 1, thus that the bootloader was not able to locate the disk containing the second stage.
If you are in an initramfs prompt, it probably means that something wrong happened during the init process :
- Are you sure that you specified the filesystems to mount in the crypttab and fstab files?
- Are you sure that all modules were currently loaded in your initramfs image? Aren’t you missing the cryptsetup or lvm modules for example?

Below are some resources that we found interesting during the writing of this tutorial, they may have some answers to your problems :
Conclusion
In this tutorial, you learnt how you can encrypt an entire root filesystem, with the “/boot” folder, using the LUKS specification.
You also learnt about the Linux boot process and the different steps that your system goes through in order to launch your operating system.
Achieving a full-system encryption is quite lengthy but it is very interesting for users that are willing to dig deeper into the Linux and open source world.
If you are interested in Linux System Administration, make sure to read our other tutorials and to navigate to our dedicated section.


