How To Change Branch Name on Git
In Git, branches are commonly used in order to have a development separated from your main workflow.
In software engineering teams, it is quite common to have a specific workflow implemented.
You may choose for example to have one branch per major release or to have a branch in order to quickfix an issue.
In both cases, you have to choose a branch name that is related to what you are working on.
However, in some cases, you may want to change your branch name.
Changing your branch name might occur because you want to add crucial information to its name. It might also be because the feature scope changed and you want to change its name accordingly.
In this tutorial, you are going to learn how you can easily change your branch name, locally or remotely.
Change Branch Name
In order to change a branch name on Git, you have to use the “git branch” command followed by the “-m” option. Next, you just have to specify the name of the new branch.
# Optional command (if you are not on the target branch)
$ git checkout <branch> $ git branch -m <new_branch_name>
Note : before changing the branch name, make sure to switch to the branch that you want to rename.
It is important to mention that this command changes the name of your local branch.
If you want your changes to be available on the remote side, you have to push your branch to the remote.
To achieve that, you have to use the “git push” command and specify the old branch name as well as the new branch name.
$ git push <remote> :<old_branch_name> <new_branch_name>Finally, you have to set the upstream branch for the newly created branch using the “git upstream” command.
$ git push <remote> -u <new_branch_name>In order to illustrate this method, let’s have a quick example.
Example changing a branch name
In this example, we are going to rename one of our branches currently named “feature”.
First of all, we are going to check on which branch we are at the moment with the “git branch” command.
$ git branch
In this case, we are already on the “feature” branch, so we do not need to switch to any other branches.
Now that we are on our “feature” branch, we are going to change the branch name to “quickfix” using the branch command.
$ git branch -m "quickfix"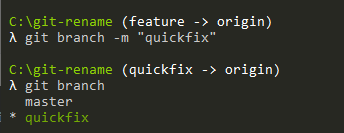
As you can see, the “local” branch name was changed to “quickfix“, but this does not mean that your branch name was updated on the remote!
Actually, if you run the “git branch” with the “-a” option (for “all”), you can see that the upstream branch is still pointing to the “feature” branch.

To change the name of the remote, you are going to push the updated references to your remote.
$ git push origin :"feature" "quickfix"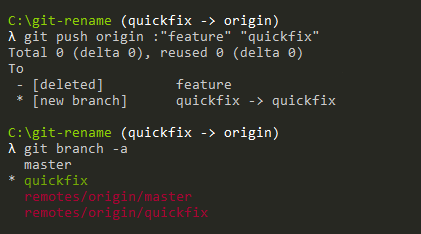
As you can see, two operations were actually performed here :
- the “feature” branch was deleted from the remote
- the “quickfix” branch was created on the remote.
However, updating your references does not mean that the upstream branch was actually updated.
To update your new upstream branch, you need to use the “push” command.
$ git push origin -u quickfix
Done!
Congratulations, you successfully changed the name of your branch on Git!
Conclusion
In this tutorial, you learnt how you can change the name of your branch on Git easily.
You learnt that you have to change the name of your branch locally and on the remote, otherwise you might run into some inconsistencies on your repository.
If you are interested in software engineering, we have a complete section dedicated to it on the website, so make sure to check it out!

Icons made by Smashicons from FlatIcon
The post How To Change Branch Name on Git appeared first on devconnected.

