Create WordPress Theme: Step By Step for Custom Development
Since its original launch in 2003, WordPress has evolved from a simple blogging tool into a powerful and popular website builder and a comprehensive CMS (content management system) used by about 38% of the websites on the web! Given its popularity, if your site needs to stand out from the crowd, you’ll need to create WordPress theme that is unique to your site.
In reality, it’s no wonder that WordPress was able to make it so far and become so popular.
The amount of flexibility it has and the features it hosts, allow its wide use across different website types. Besides, WordPress is fairly easy to use with little to no prior experience in coding or web development whatsoever.
These are the reasons behind WordPress’s success story and are precisely the reasons nearly 40 percent of all websites on the World Wide Web are powered by this software.
WordPress has an array of handy features that make web development and programming less complicated and more accessible to everyone.
Introduction to WordPress Theme Development
Another popular feature that makes WordPress so popular is its themes. The theme is simply a collection of stylesheets and templates which define how a WP-powered site will look and display.
The software gives the user a wide variety of different editing options when it comes to themes from the WP admin area.
Hundreds of WordPress themes are completely free or with many others at a reasonable price of a few tens of dollars.
In fact, WordPress.org hosts a huge database of themes in their Themes Directory.
Other websites such as Themeforest also offer lots of premium themes from different developers.
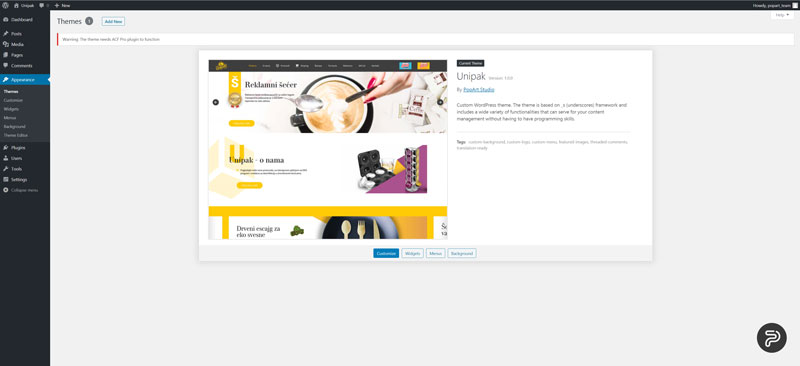

Each of these themes features a different layout, design pattern, and features.
It’s up to the user to find one that will suit their website’s needs the best. In most cases, themes are made with particular industries or professions in mind, meaning that, for example, restaurant owners can easily find themes with booking features.
While there are plenty of awesome themes that might suit your needs, it’s safe to say that if you want to make something outstanding, you’ll pretty much have to do it yourself. If you’re unable to program, a good alternative option would be to go for a freelance software developer (prices may vary depending on various factors).
In this article, however, we’re going to go over ALL the steps necessary to create your very own custom WordPress theme for your WP-powered website. We will be taking a look at every important aspect to make sure that you get the best that WordPress has to offer.
Getting started with creating your very own theme as a beginner might, at first glance, seem like a mammoth task.
However, creating a custom theme from scratch isn’t too complicated in WP. You don’t need to be a web development whizz, if you’ve got the basics of coding with PHP, you can easily learn how to create a WordPress theme.
Moreover, creating your own theme can be quite rewarding, especially when you see the end result live on your website.
Creating your first custom WordPress theme
In order to get started with creating a WordPress theme, you’ll need a few basic things:
- A WordPress website
- A good hosting plan
- A little prior experience with things such as local staging environments
- Basic understanding of CSS and PHP coding languages
- A starter theme
Understanding the WordPress Template Hierarchy
In WordPress, template files (the building blocks of your theme) are modular and reusable.
Template files are responsible for generating the pages on your WP site. Some of these files are used on almost all of your pages while others are used only in specific circumstances.
Have a look at the diagram below – it explains how the WordPress template hierarchy is organized.
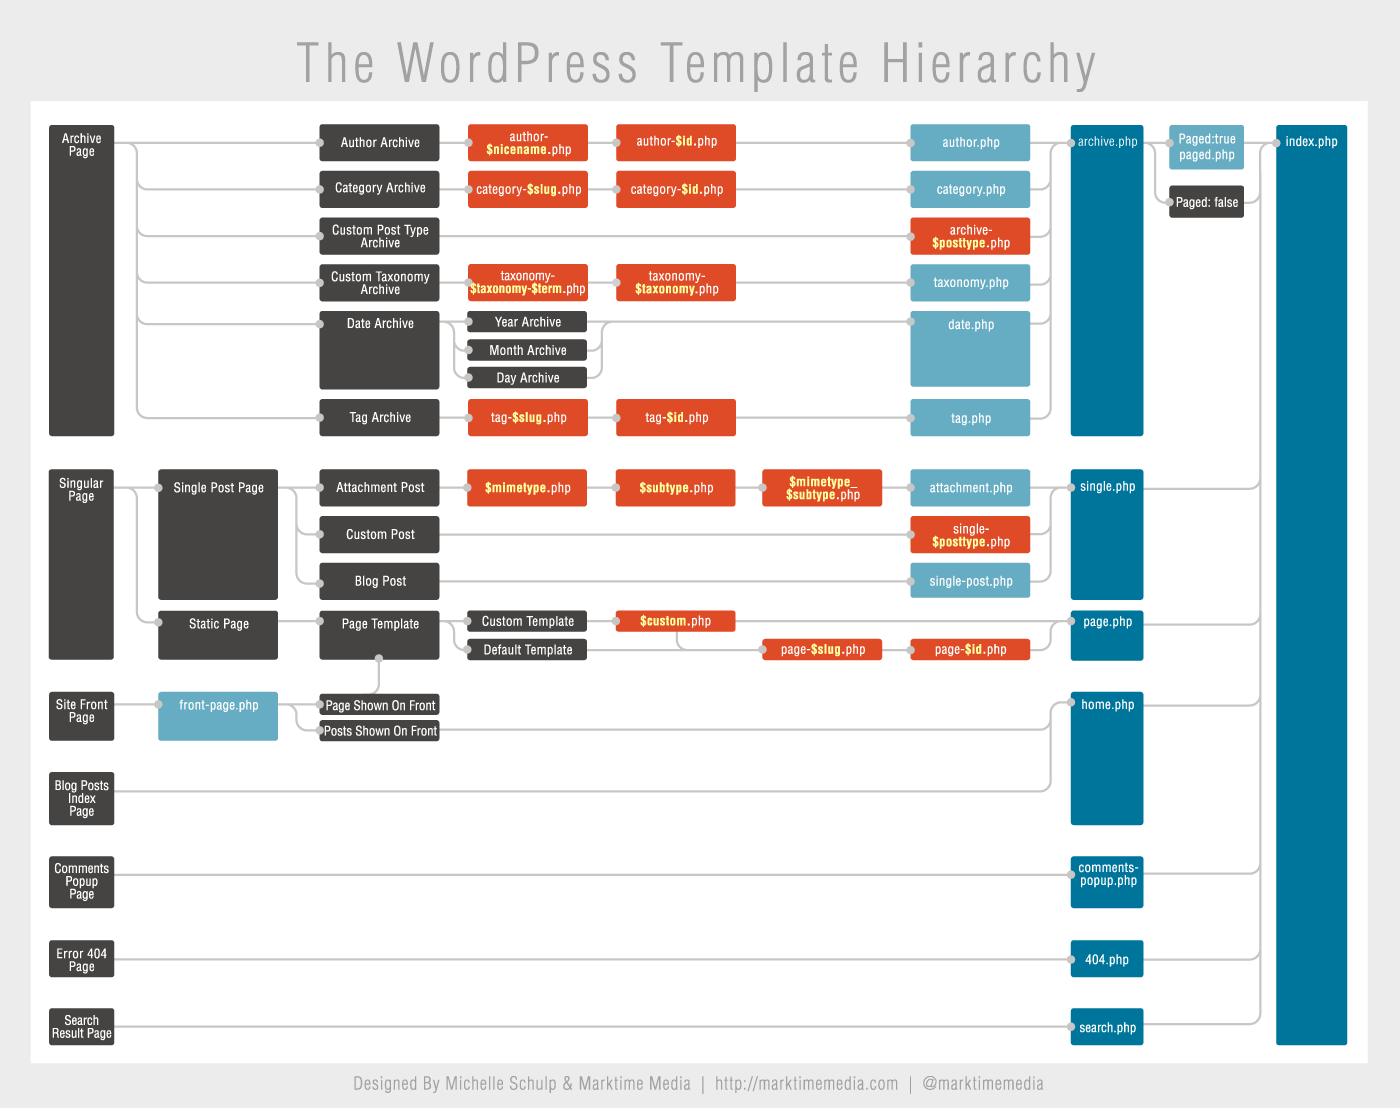

Template files will determine the overall look of the content on the website. If you want to create a header, you will use a header.php file, or if you want to add a comment section, you’ll use the comments.php file.
To understand the template hierarchy, you should know that WordPress uses something called a “query string” to decide which template or template set should be used to create and display a certain page.
The query string is information stored in the link of each part of the website you’re trying to modify. In simpler terms, WordPress analyzes the info and performs searches through the template hierarchy to find a template file that matches the provided info in the query string.
This is basically a scheme in which WP looks for matching template files every time pages are loaded.
For example, if you type in the following URL http://example.com/post/this-post, WordPress will locate the necessary template files in the following order:
- Files that match the slug, in this case, this-post.
- Files matching the post ID.
- A generic single post file, like single.php.
- An archive file, in this case, archive.php.
- The index.php file.
The last file (index.php) is required in every theme, as it’s the default (or fallback) if no other file can be found in the matching process. Underscores (a WP starter theme) has the most common files. These files included in this theme will work right out of the box.
You can edit them if you feel like experimenting, or need to create some custom functionality on your site.
What is a WordPress Starter Theme?
A starter theme is a bare-bones foundation of a custom WordPress theme.
You can use it as the basis to get your own unique theme up and running. With a starter theme, you can build your very own custom WordPress theme without having to design or code an entire theme from scratch.
WordPress starter themes contain all the files as defined per the above hierarchy.
Using a starter theme enables you to get a better understanding of how WordPress functions because it shows you the basics, the structure of a theme, and how the different parts work together.
A custom-built WordPress theme can be applied to a range of different website types from presentations and directories-to online shops built with WooCommerce, social media, or whatever else you may need your website for.
Opting for starter themes (such as UnderStrap, Underscores, and Bones ) will help create WordPress theme that opens the door to using a variety of different options.
Using Underscores might be the best choice for beginners as it offers the most important features. It also comes from a long-time and reliable developer. This means that it’s more likely to be compatible, secure, and reliable, and will have better support in the long run.
Why Should You Use a Starter Theme
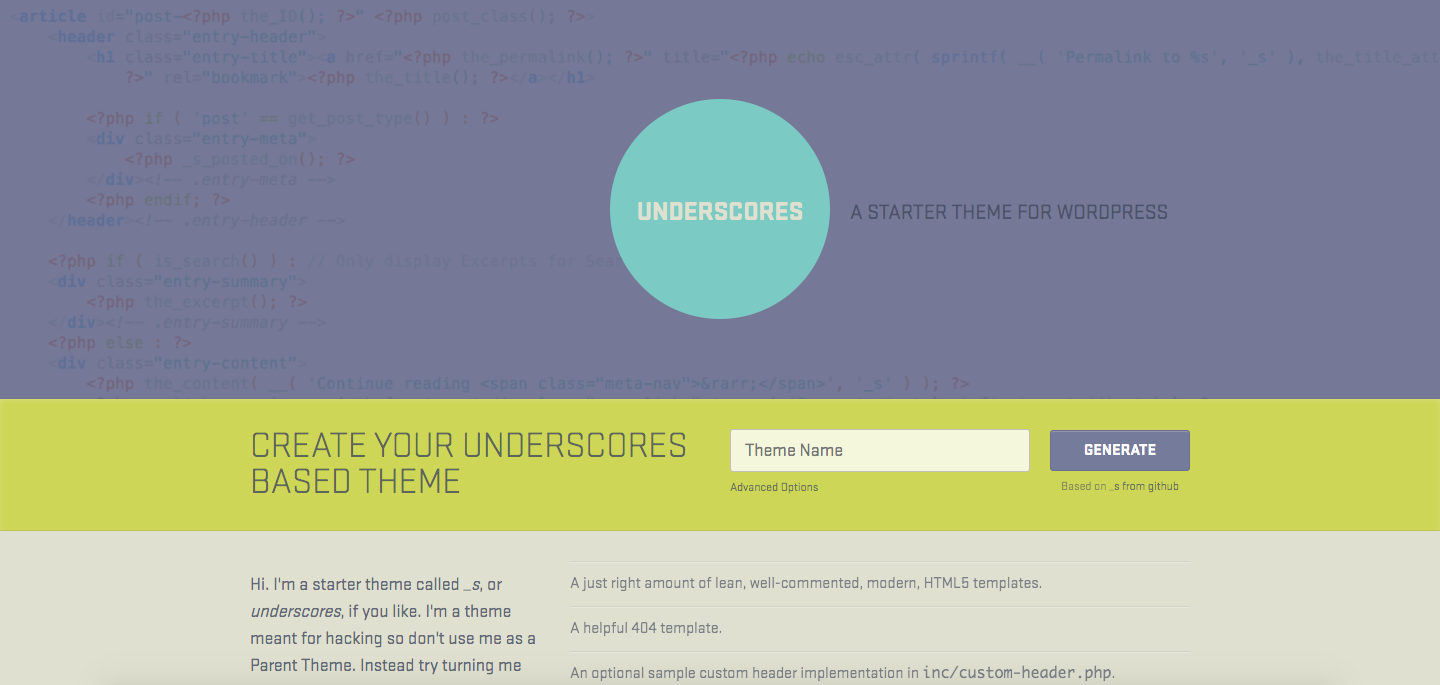

As stated above, a starter theme is a foundation, a blueprint that helps you come up with a unique website. It’s already fully functioning but still lacks the defining key features which make a user-friendly website.
Essentially, it still needs to be styled and properly configured.
That being said, starter themes are ideal for those who have little or no experience with WordPress or web development in general. It’s a great way to get introduced to the topic of theme building and learning the basics of WP-powered websites.
A WordPress Starter theme saves you time and requires little to no background knowledge in coding and the rest of the WordPress complexities.
You can leverage years of hard work of the developers of the starter theme and use these guidelines to get a better understanding of how WordPress and theme design work.
Popular Starter Theme Examples
- Underscores – A reliable and renowned starter theme that gives beginners a head start in theme development. Underscores is fairly basic and perfect for getting started right away if you have all the necessary tools. The theme is great for understanding the concepts of theme development. Underscores is all about starting a new project which should be viewed more like a constantly evolving toolkit and less like a framework.
- Roots – This starter theme gives you an approach that’s geared more towards developers with its markup being based on the HTML5 Boilerplate. It also supports more advanced tools like Bootstrap and Grunt. The Roots starter theme also includes a theme wrapper which helps you keep your process streamlined and eliminates calling the same template parts repeatedly.
Roots also uses CSS preprocessors and supports LESS, a backward-compatible language extension for CSS, that can significantly speed up the process of developing your theme.
That being said, Roots gives a more pragmatic approach and requires a bit more know-how from the developer.
6 Basic Steps to Develop Your WordPress Theme
After covering the basics, you are finally ready to get started with creating a WordPress theme.
Since this article is geared more toward beginners, we will be using a starter theme, however, you are also free to create everything from scratch without any starter themes.
If that’s the route you want to take, don’t forget that you will need a lot more time and will need to immerse yourself a little deeper in coding, and web development in general.
1. Setting Up the Development Environment
Your first step in the process should be creating a development environment.
This is basically a server you need to install on your computer to manage and develop local WP sites. A development environment enables you to develop your website safely, besides giving you to multiple options for creating a local environment.
Using DesktopServer is one of the ideal paths you can take. It’s an easy way to get a local and fast version of WP which is compatible with both Windows and Mac. Select the free version, register and download it, then install the software.


Once you’ve installed, open the program and configure your local environment.
It’s a fairly simple process and you’ll be ready in minutes. After the setup, you’ll have a website and development environment that will both work and look like any live WP website.
2. Download and Install a Starter Theme
The most basic starter themes (like Underscores) are easy for first-timers to get started with.
Contrary to most basic themes, Underscores allows customizing options through its Advanced Options (like author and description) after naming your theme.
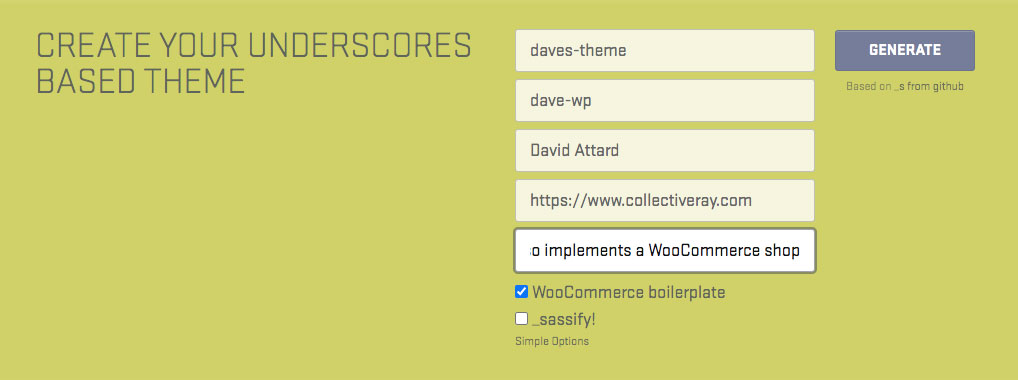

You can also add Syntactically Awesome StyleSheets or SASS which is a preprocessing CSS language enabling you to introduce features like nesting, math operations, utilization of variables, etc.
After making your choices, all you have to do is to click on Generate to download the .zip file with your starter theme.
Now, install the file on your local site. If you’ve done everything correctly, you are now able to see a bare-bones, basic version of your custom WordPress theme.
Understanding the WordPress Core Principles
Now that the basics are set up, you can get to work. However, before diving into the customizing process, you’ll need to get familiar with the core principles and components of creating a WordPress theme using core principles of WP.
First of all, you must learn about template files, the main building blocks of any theme in WP.
Template files basically determine how your layout and content will be displayed on your site. If you want to create a header, you’ll want to use the header.php file, while comments.php would be used to display any comments.
As discussed above, WP uses its template hierarchy to determine which template file it will choose to execute the content a user is requesting/needs. You can work with these files as they are, but given that you are here to create WordPress theme, your bulk of work will be to tweak these files to your needs.
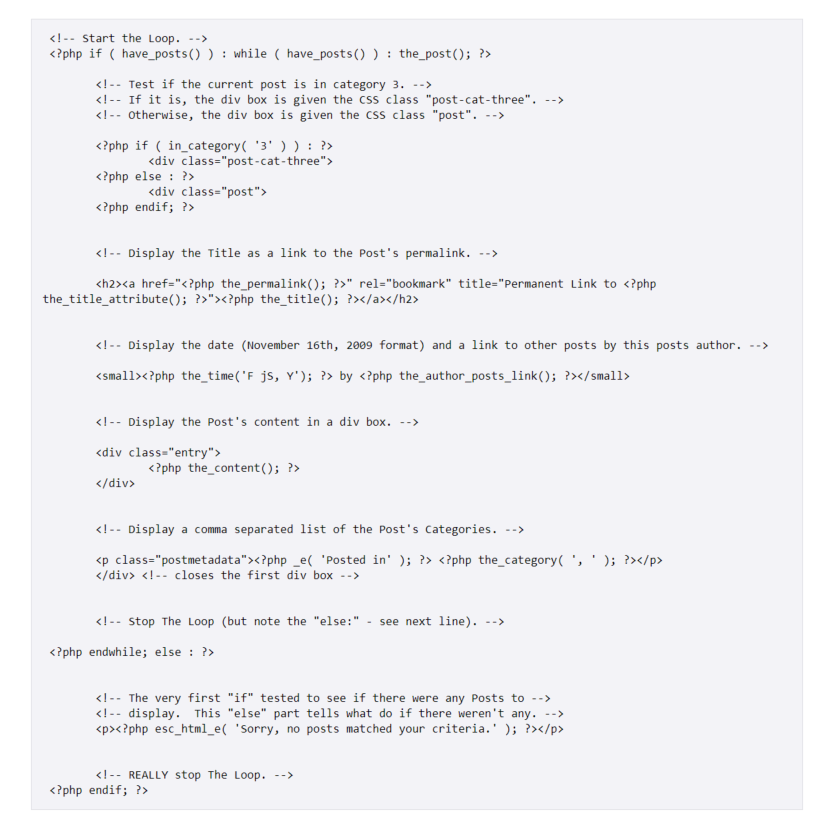

When we are talking about WP core principles, you should also understand the concept behind The Loop.
It is the code WP primarily uses to display your content and it can be found in all content displaying template files, like the index.php or sidebar.php. It’s a fairly complex subject but fortunately, it comes bundled in with the starter theme (if you use Underscores) meaning your process should be simpler.
You’ll need to understand the concept and work with it. Check out some of the examples in the link above, to better understand how the loop is used and how you can customize the code to your needs.
3. Create Theme Details
Themes aren’t purely cosmetic components.
There are loads of different features you can add to your site which can improve functionality. We’re going to discuss how to implement a few basic features to spice up your website.
Adding Hooks can enable you to run different PHP actions, display other info, or insert styling data as necessary.
Hooks are code snippets that are inserted into template files. Most of them are directly implemented as part of the core of WordPress, but some hooks are pretty useful when customizing themes as well.
Here’s a list of the most common hooks and their roles:
- wp_head() – is added to the <head> element in header.php. It enables scripts, styles, and other info which runs when the site starts loading.
- wp_footer() – usually added to footer.php before the </body> tag, most often used to insert code for Google Analytics or other code that needs to show up on each page but is too heavy to load in the header.
- wp_meta() – Generally found at sidebar.php, and it’s most often used to include additional scripts (for example, a tag cloud).
- comment_form() – Added to comments.php directly before the file’s closing </div> tag to show comments.
When you’re using Underscores, these hooks will be already included with the theme, but it’s always a good idea to learn more about them and see all available hooks. Hooks allow you to extend the capabilities of your custom theme.
4. Adding Styles using CSS
Cascading Style Sheets or CSS defines the appearance of the content on the site you’re creating.
By using the style.css file, which is already included in your theme, you can edit any of the styles found here and save them to see how it changes your design. By default, it only contains the basic styling.
CSS is used to enable the presentation and separation of the content on your website, everything from layout to fonts and content. CSS can help make the content on your site more accessible and more flexible.
Going into depth about how to use styling with WordPress themes can get quite hairy and is beyond the scope of this article. If you’re not too sure about this, you might want to read up more on CSS before you go on.
5. Including JavaScript
Adding JavaScript files to your theme if necessary can boost interactive features and capabilities and have a better functioning site. It especially comes in handy when you want to incorporate third party plugins into your sites, like specific video or audio players, stuff such as sliders, popup support and other 3rdparty libraries to create advanced functionality.
To use Javascript with your custom site, you can create a call using the syntax below to add the script file to the theme.
Alternatively, you can use the script directly in your header.php template file between the meta tags and the style sheet link, as you would do in the case of an HTML page. When using it in the header file, it should look something like this:
<script type=”text/javascript” src=”/scripts/emailpage.js”></script>
If you want to use JS directly add the call for the files directly as per below. If you want to set a “send this to a friend” feature, you can put it under the post title. That would look similar to this:
<h3 class=”storytitle”>
<a href=”<?php the_permalink() ?>” rel=”bookmark”>
<?php the_title(); ?></a></h3>
<div class=”emailpage”>
<script type=”text/javascript”>
<!–
emailpage();
//–></script>
</div>
You can also enqueue scripts using syntax shown later on in this article.
6. Test your theme and export it
When you’re done with all the above, it’s finally time to test your created custom WordPress theme to make sure it runs smoothly.
For this purpose, you can use the Theme Unit Test Data, a set of dummy data that you can upload to your site. The data consists of style variations and different content enabling you to see how effectively your theme can handle both predictable and unpredictable data.
Test everything thoroughly (according to the above Codex link) such that you can be sure that the theme you’ve created meets the required standards and lives up to your expectations before exporting it.
Once you are confident of the testing, you can export the theme.
You can do the export by finding the place you installed the website development environment locally.
Open the folder and access /wp-content/themes/, where you can find the theme you were working on.
Now, with a compression tool, create a zip.file based on the folder by compressing it. When you’re done all you have to do is to upload and install it on any WordPress site. You can also submit it to the WordPress Themes Directory.
Detailed WordPress Theme Development Guide
Now that you’ve done the basics, the next steps will list some additional details on how to create WordPress theme.
Creating custom theme files/directories
As you already know, WP themes are created from different template files which at the very least will include a sidebar.php, header.php., and footer.php. You can call these using the template tags (get_header(), when calling the header, get_sidebar(), when calling the sidebar, etc.).
You can also create custom versions of these files with slight modifications like these: sidebar-{your_custom_template}.php, header-{your_custom_template}.php and footer-{your_custom_template}.php.
You can also call the template tags with the same analogy with the template name as a parameter like this:
get_header( ‘your_custom_template’ );
Pages are created by various files meaning that you can also create other custom template files and call them at any given location within the page by simply using get_template_part(). Just give the file an appropriate name and use the same custom method as with the header, footer, and sidebar files.
Let’s say you want to create a template that handles your content – you just need to create a file called content.php and then extend the file name to add a specific layout. In this case, let that be content-product.php.
In the end, when you load the template file in the theme, it would look something like this:
get_template_part( ‘content’, ‘product’ );.
Using Directories
To link to theme directories simply use the function get_theme_file_uri();
This function will return the full URI to your theme’s main folder and you can use it to reference files and sub-folders by using the following example:
echo get_theme_file_uri( ‘images/logo.png’ );
Enqueue Scripts and StyleSheets
When coming up with your own theme, you can also create custom stylesheets and your own JavaScript files too.
Whenever you’re doing this make sure to load them using the standard WordPress method, otherwise, there’s a chance that your theme and plugins might not work correctly in all circumstances.
All you need to do is to create a function that enqueues all of the styles and the scripts. For this, WP creates both a handle and a path to find the file and the dependencies (if there is any), once this happens, you’ll need to use a hook to insert the stylesheets and the scripts.
The basic function for enqueing style:
wp_enqueue_style( $handle, $src, $deps, $ver, $media );
For enqueing scripts:
wp_enqueue_script( $handle, $src, $deps, $ver, $in_footer);
Enqueue Google Fonts
Google fonts are an excellent free resource of fonts for web designers and they can be simply added to your custom theme.
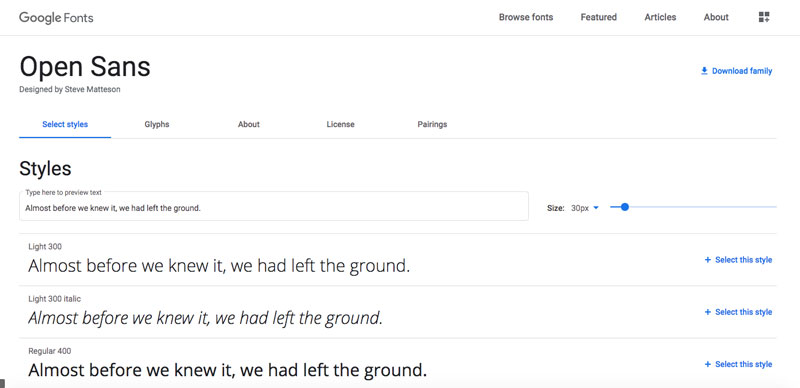

First, you’ll have to find a font type you like at the Google fonts library. Once you’ve found a font you want to work with, simply click on the “Select this style” button, which takes you to a new page.
If you scroll down here, you can find the instructions for their usage in a box with the necessary code that you can add to your site.
You can add the fonts either by the standard and recommended method, or you can opt for either the @import CSS method or using the Javascript method.
You can also add it to WP by enqueuing the font in your theme’s functions.php.file or by using a specific plugin.
function wpb_add_google_fonts() {
wp_enqueue_style( ‘wpb-google-fonts’, ‘https://fonts.googleapis.com/css?family=Open+Sans:300italic,400italic,700italic,400,700,300’, false );
}
add_action( ‘wp_enqueue_scripts’, ‘wpb_add_google_fonts’ );
On most sites, the Header, footer, and sidebar will be same on all pagese. It’s true that in some cases, you’ll want to customize a few things, but in general they are consistent.
So, to divide the page into a header and footer you’ll want to cut and paste from the index.php page, the relevant parts that should be in the header/footer and sidebar. This depends a little bit on your current index.php.
For example, if you are using underscores, the header and footer have already been defined correctly in the header.php and footer.php.
Let’s continue this example as if we are creating the content for the header.
In most websites, the headers contain the essential head styles and navigation to the website.
Start from <!DOCTYPE html> add <?php wp_head(); ?> before the closing </head>. You should have something like this. This is based on the underscores starter theme, but you may want to tweak the header as necessary to create your own customizations.
<?php
/**
* The header for our theme
*
* This is the template that displays all of the <head> section and everything up until <div id=”content”>
*
* @link https://developer.wordpress.org/themes/basics/template-files/#template-partials
*
* @package Daves_Theme
*/
?>
<!doctype html>
<html <?php language_attributes(); ?>>
<head>
<meta charset=”<?php bloginfo( ‘charset’ ); ?>”>
<meta name=”viewport” content=”width=device-width, initial-scale=1″>
<link rel=”profile” href=”https://gmpg.org/xfn/11″>
<?php wp_head(); ?>
</head>
<body <?php body_class(); ?>>
<?php wp_body_open(); ?>
<div id=”page” class=”site”>
<a class=”skip-link screen-reader-text” href=”#primary”><?php esc_html_e( ‘Skip to content’, ‘daves-theme’ ); ?></a>
<header id=”masthead” class=”site-header”>
<div class=”site-branding”>
<?php
the_custom_logo();
if ( is_front_page() && is_home() ) :
?>
<h1 class=”site-title”><a href=”<?php echo esc_url( home_url( ‘/’ ) ); ?>” rel=”home”><?php bloginfo( ‘name’ ); ?></a></h1>
<?php
else :
?>
<p class=”site-title”><a href=”<?php echo esc_url( home_url( ‘/’ ) ); ?>” rel=”home”><?php bloginfo( ‘name’ ); ?></a></p>
<?php
endif;
$daves_theme_description = get_bloginfo( ‘description’, ‘display’ );
if ( $daves_theme_description || is_customize_preview() ) :
?>
<p class=”site-description”><?php echo $daves_theme_description; // phpcs:ignore WordPress.Security.EscapeOutput.OutputNotEscaped ?></p>
<?php endif; ?>
</div><!– .site-branding –>
<nav id=”site-navigation” class=”main-navigation”>
<button class=”menu-toggle” aria-controls=”primary-menu” aria-expanded=”false”><?php esc_html_e( ‘Primary Menu’, ‘daves-theme’ ); ?></button>
<?php
wp_nav_menu(
array(
‘theme_location’ => ‘menu-1’,
‘menu_id’ => ‘primary-menu’,
)
);
?>
</nav><!– #site-navigation –>
</header><!– #masthead –>
The same process should apply to the footer as well.
Using Functions.php
The theme functions.php file is a template file in the WP theme which acts like a “master” that loads automatically both for admins and front-end pages of a site.
Usually, it defines functions, actions, filters, and classes that other template files use in the theme. Also, it can be used to extend the functionality of the theme through additional hooks, actions and filters.
You can easily find the functions.php file in the theme folder. You can add built-in WP and regular PHP functions alike to filters and hooks which are already defined in the WP core.
You can simply create a functions.php file by creating a plain-text file that you name functions.php and put it on the theme’s directory. With this file, you can enable post formats, navigation menus, and post thumbnails along with WP actions and filters.
Check out the functions.php file from a starter theme to see a few examples of what can be done. You can also search for articles that use the functions.php that extend the functions of a WordPress site using the functions file.
Using Main Settings in the Theme
The Main settings allow changing certain theme settings without modifying theme files or having to change any code. A detailed description of this is outside the scope of this article, so we’ll refer you to a couple of articles that explain this concept in detail.
- Settings API description on WordPress Codex.
- Complete Guide to WordPress Settings API
The WordPress Loop
As we have discussed before, the Loop is a default mechanism used by WP to display posts through template files.
Using the loop mechanism, WP retrieves the posts on current pages and formats them according to the “instructions” in the loop.
Basically, it loops through the posts for the current pages one at a time by performing the action specified in the theme.
You can use the loop for
- Displaying content and comments
- Displaying post titles and excerpts on the blog homepage
- Display data from Custom Fields and Custom Post Types
- Display the content on individual pages by using template tags.
- Customize the Loop to display and manipulate content in template files
If you’re using the Underscores starter theme, you’ll find the WordPress loop being used in the single.php and page.php files. You may want to look at these files to understand how it works and / or can be used.
get_header();
?>
<main id=”primary” class=”site-main”>
<?php
while ( have_posts() ) :
the_post();
get_template_part( ‘template-parts/content’, get_post_type() );
the_post_navigation(
array(
‘prev_text’ => ‘<span class=”nav-subtitle”>’ . esc_html__( ‘Previous:’, ‘daves-theme’ ) . ‘</span> <span class=”nav-title”>%title</span>’,
‘next_text’ => ‘<span class=”nav-subtitle”>’ . esc_html__( ‘Next:’, ‘daves-theme’ ) . ‘</span> <span class=”nav-title”>%title</span>’,
)
);
// If comments are open or we have at least one comment, load up the comment template.
if ( comments_open() || get_comments_number() ) :
comments_template();
endif;
endwhile; // End of the loop.
?>
</main><!– #main –>
<?php
get_sidebar();
get_footer();
Menu and Pages
You can select your primary menu in the WP Menu Editor (located at Appearance – Menu). Your theme may support more than one navigation menu at different places within your theme.
There are also ways to register additional menus, for example, you may want to create a “footer” menu.
Have a look at the WordPress codex to understand how to do this: https://codex.wordpress.org/Navigation_Menus
Custom page
WP allows creating pages and posts by default. It controls page appearance through the page.php template file.
While this file affects all single pages in your theme, you can modify their layout and appearance. Editing these custom page templates in WP requires a bit of HTML, PHP, and CSS, but once again, it should be fairly straightforward.
Index.php
This template is the default fallback template in WordPress for displaying any page when the template hierarchy cannot find any other page that matches your given parameters.
You’ll need to use this to cater for anything that is not handled by the rest of the template files.
Archive.php
The archive.php template is used to display tag, author, category, and other archive custom pages.
Creating an archives page can be a good way to pull all your content into one single page.
Category
In WP web development, it’s not uncommon to use various templates for categories, custom post types, taxonomies, and tags. By creating different templates categories, you can include different features on each category page.
A typical category.php template will look similar to this:
<?php
/**
* A Simple Category Template
*/
get_header(); ?>
<section id=”primary” class=”site-content”>
<div id=”content” role=”main”>
<?php
// Check if there are any posts to display
if ( have_posts() ) : ?>
<header class=”archive-header”>
<h1 class=”archive-title”>Category: <?php single_cat_title( ”, false ); ?></h1>
<?php
// Display optional category description
if ( category_description() ) : ?>
<div class=”archive-meta”><?php echo category_description(); ?></div>
<?php endif; ?>
</header>
<?php
// The Loop
while ( have_posts() ) : the_post(); ?>
<h2><a href=”<?php the_permalink() ?>” rel=”bookmark” title=”Permanent Link to <?php the_title_attribute(); ?>”><?php the_title(); ?></a></h2>
<small><?php the_time(‘F jS, Y’) ?> by <?php the_author_posts_link() ?></small>
<div class=”entry”>
<?php the_content(); ?>
<p class=”postmetadata”><?php
comments_popup_link( ‘No comments yet’, ‘1 comment’, ‘% comments’, ‘comments-link’, ‘Comments closed’);
?></p>
</div>
<?php endwhile;
else: ?>
<p>Sorry, no posts matched your criteria.</p>
<?php endif; ?>
</div>
</section>
<?php get_sidebar(); ?>
<?php get_footer(); ?>
The sidebar is the area where you can put your widgets in a WP theme. Most often than not, it is on the right side or below your content on all pages.
Sidebars are used to display things that aren’t directly connected to the post or page content but stuff such as links to different areas of your site, sign-up forms, ads, social media links and so on.
Typically the sidebar is used in conjunction with WP widgets.
Here’s how you can add a widget-ready sidebar to your theme:
function wpb_widgets_init() {
register_sidebar( array(
‘name’ => __( ‘Main Sidebar’, ‘wpb’ ),
‘id’ => ‘sidebar-1’,
‘description’ => __( ‘The main sidebar appears on the right on each page except the front page template’, ‘wpb’ ),
‘before_widget’ => ‘<aside id=”%1$s” class=”widget %2$s”>’,
‘after_widget’ => ‘</aside>’,
‘before_title’ => ‘<h3 class=”widget-title”>’,
‘after_title’ => ‘</h3>’,
) );
register_sidebar( array(
‘name’ =>__( ‘Front page sidebar’, ‘wpb’),
‘id’ => ‘sidebar-2’,
‘description’ => __( ‘Appears on the static front page template’, ‘wpb’ ),
‘before_widget’ => ‘<aside id=”%1$s” class=”widget %2$s”>’,
‘after_widget’ => ‘</aside>’,
‘before_title’ => ‘<h3 class=”widget-title”>’,
‘after_title’ => ‘</h3>’,
) );
}
add_action( ‘widgets_init’, ‘wpb_widgets_init’ );
Individual Post Pages (single.php)
Let’s say you want to use a different template or layout for a specific article on your website.
For this, you’ll have to create a custom single post template. This is pretty similar to creating custom pages. By following the basic guidelines applied there, you can easily create individual posts as well.
Creating a Featured Image
To add support for featured images, simply add the following code to the theme functions.php file:
add_theme_support( ‘post-thumbnails’ );
Now, you can go to your pages or posts and check if the featured image option is available. Chances are, WP won’t display it automatically, so to display the image, you might need to make slight edits to your templates that where pages and posts are displayed by adding this code:
<?php the_post_thumbnail(); ?>
This feature allows you to page back and forth through your content pages. You can use this feature when viewing post lists with more entries than can fit on a single page or when you want to break up longer posts by using the <!–nextpage–> tag.
The simplest form of pagination is placing the posts_nav_link().function in the template after the loop. This generates links both to the next page of posts (when you’re breaking up post lists) and to the previous posts where applicable.
posts_nav_link();
You can also use next_posts_link & prev_posts_link to control where the previous and next posts page link shows up.
next_posts_link();
previous_posts_link();
Comments are an essential part of any blog or page. It gives website visitors the possibility to reach out to you, give feedback, ask questions and generally, create a deeper bond with your website and your content.
All comments are displayed in the admin area and there are several features you can add, from enabling commenting only for specific users to comment moderation.
You can use the comments.php file to customize the look and feel of comments in your theme.
Other pages and Files
Depending on your needs, you can find or create different pages and files and can tailor them to your preferences by using the same or similar guidelines mentioned above.
Using Parent/Child Theme
Parent theme
Parent themes in WP are themes that are declared “parents” by other themes, namely, child themes.
A child theme is used to allow designers and developers to create customizations to themes without breaking the possibility to update the parent theme. This is because if a developer changes the original theme files, then when performing a theme update, the changes are lost.
However, parent themes pass on their features and functionality to their child themes. Developers are free to make changes to the child theme’s functionality and features without affecting the parent theme’s upgradability.
Child theme
Child themes inherit the functionality of the parent themes. They are primarily used to modify an existing theme without losing any previously added custom styling during theme updates.
Child themes speed up the development process because it’s easy to create modifications with them.
Most themes will create a child theme and make it available with the theme, so that anybody who uses the theme can customize it through the child theme. We define how to create a child theme, in our article here.
Using Development Frameworks
This term refers to the code libraries that are used in theme development.
Development frameworks were created to serve as parent theme templates with all the functionality. Basically, like with parent themes, frameworks remain untouched while developers can carry out modifications in child themes.
This makes development faster and eases getting rid of bugs in specific theme frameworks. Notable Development frameworks include the Genesis theme framework, Themify and Divi by Elegant Themes.
Wrapping up how to Create WordPress Theme
The above has been a detailed step-by-step guide to getting started with developing your own custom WordPress theme.
All in all, while you need to have a good understanding of WordPress and PHP, it’s not such a demanding process. Knowing web development basics is important, and you can understand the WordPress core in more detail as you develop. If you don’t feel like being up to the task just yet, it’s okay, take your time and experiment a bit.
Once you’ve made a few mistakes, you’ll start learning more and more. It’s also good to take a look at the code base of other popular themes to understand what they are doing and get a good idea of practices that makes sense.
Do let us know if you have any questions in the comments below.


